
usd Herolab proudly presents the Cyber Security Transformation Chef (shorthand CSTC), which is a Burp Extension for various input transformations. It implements a generic way to replace the need for numerous specialized extensions.
After the initial presentation at DEF CON 27 we submitted our CSTC extension to Burps BApp Store and made the source code available on GitHub. We highly welcome feedback and contributions to make CSTC an even more useful extension.
Why another extension?
There is always the question: Why does anybody need another extension in Burp? The answer is that often other extensions are built to solve a specific problem and cannot be used for other similar problems.
The CSTC solves this problem by being a generic problem solver tool. It contains a wide range of very simple operations, but these operations can be chained into complex transformations allowing a Pentester to create exactly the transformation needed to test a specific product without the need of writing code. As we all now, writing code is not a very big problem, but setting everything up and fighting with the tools can be.
Tool Overview
This is the tab, which is added to the Burp Suite after loading the extension:
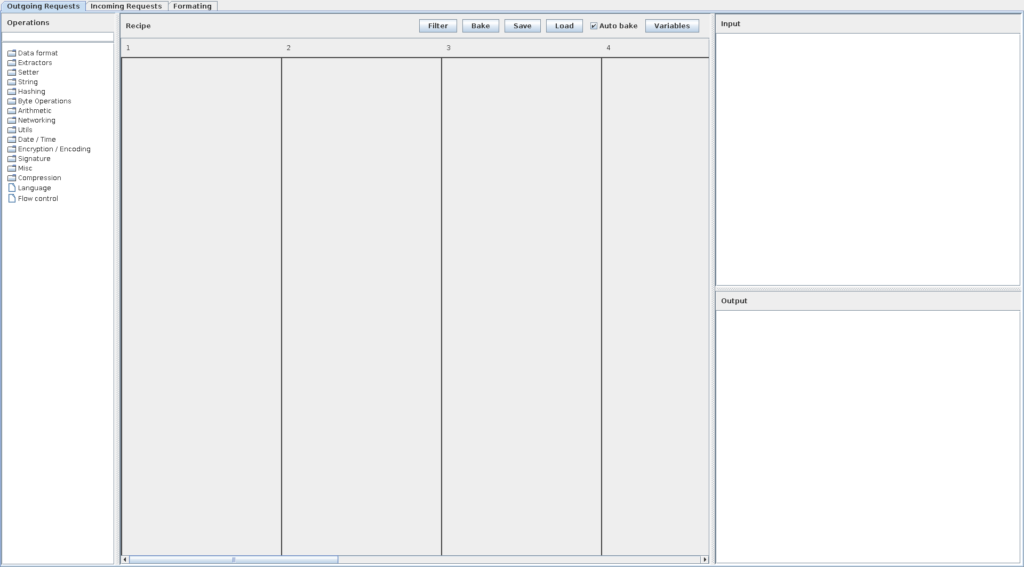
We will now discuss the different areas that can be seen in the screenshot below.
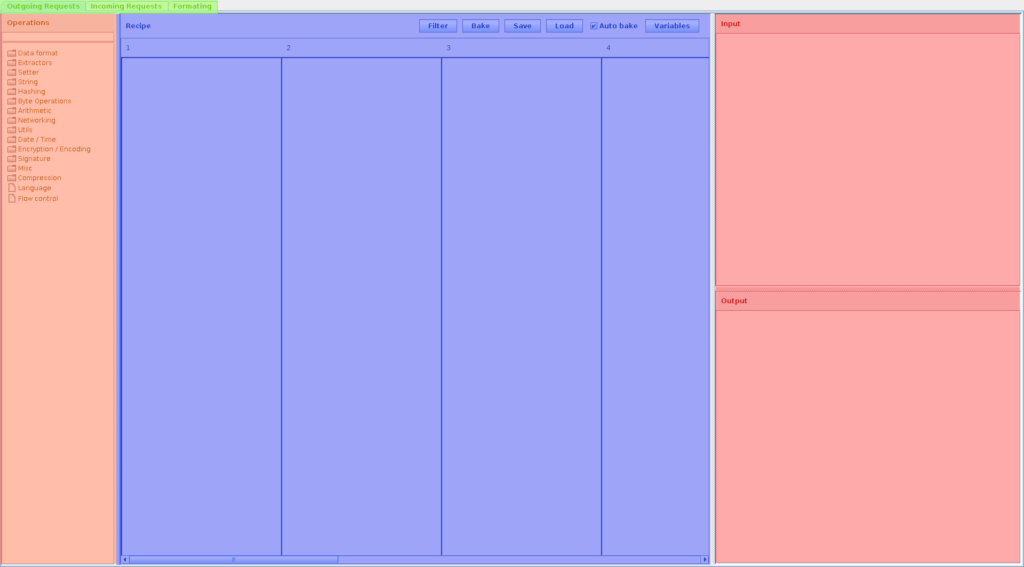
Chain Selector Tabs (At the top; green)
The CSTC has the capability to not only change outgoing requests, but also to change incoming requests. In addition, the CSTC can be used to display changed messages to the Pentester in a new tab. This is quite useful for observing zipped/encoded cookie values, for example.
Operations (On the left side; orange)
The operations menu gives an overview of all operations currently available in the CSTC. The operations are grouped by different categories. At the top is a search box for finding the right operation quickly.
Input/Output (On the right side; red)
The Input and Output text areas show what is going into the CSTC before and after the transformation. Don’t be confused by the naming here. There is always something entering the transformation and something leaving the transformation. This is the Input and Output box here. If it is in the “Outgoing Requests” tab, the input would be a request that you send in the Repeater for example. If you are in the “Incoming Responses” tab, the input will be the answer from the webserver and the output will be what is going to be displayed in the Burp Suite (and also what you will get in the browser).
Recipe (In the middle; blue)
This is where the magic happens. This is the place where recipes are built using the small operations you have on the left side. Users can drag and drop the operations into this window.
You can see vertical lines numbers at the top. This is what we will call a lane. Each lane has a number at the top, which represents the position of the lane. The lanes are placed from left to right in increasing order.
Each lane is fed with the unchanged input. The last active lane (meaning the lane with the biggest number and a not disabled operation in it) determines the output of the whole recipe. The result of each lane is also saved into variables, which can be used as additional input for certain operations.
Variables
The variables window can be opened by clicking on the Variables Button in the recipe panel. It can be used to review the currently used variables and their content. The variables are automatically created for each tab (incoming, outgoing, formatting) and each active lane inside these tabs. So you can use any variable available here in most of the input boxes inside the operations. You need to prepend a $ before the variable name to use it. This is to reduce false positives with the chosen names. A quick way of adding variables to a textbox is to just right click the box. A popup menu will let you choose from all available variables.
Notice: Due to incompatibility issues with Burp’s BApp Store we had to switch the variable prefix from § to $.
Real World Example 1
Now we talked a lot about how the tool is built and how it can theoretically be used. Let us just use an easy example to see what the benefits of the CSTC are.
Let us say we have a web application and we look at the first interesting looking request:
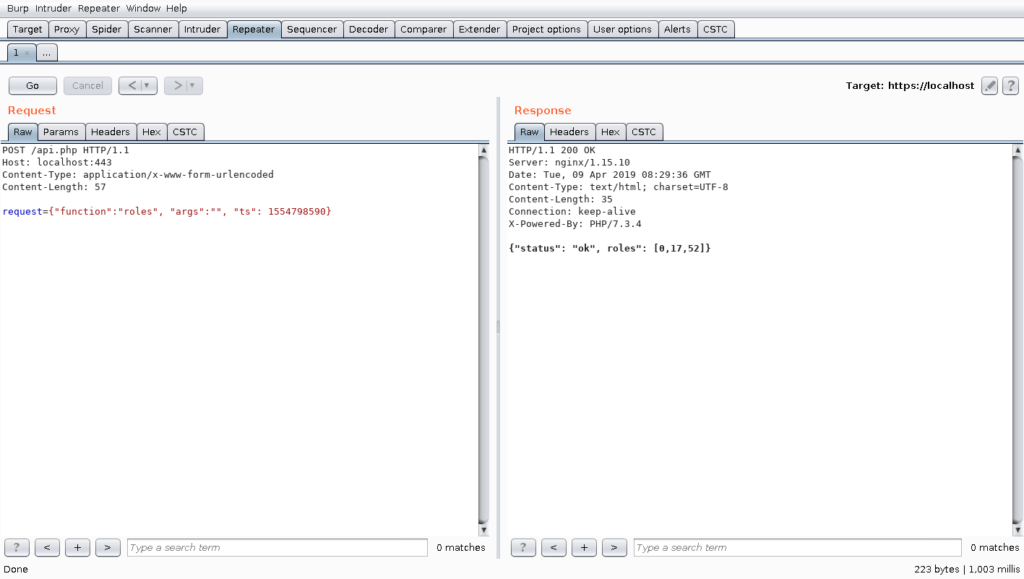
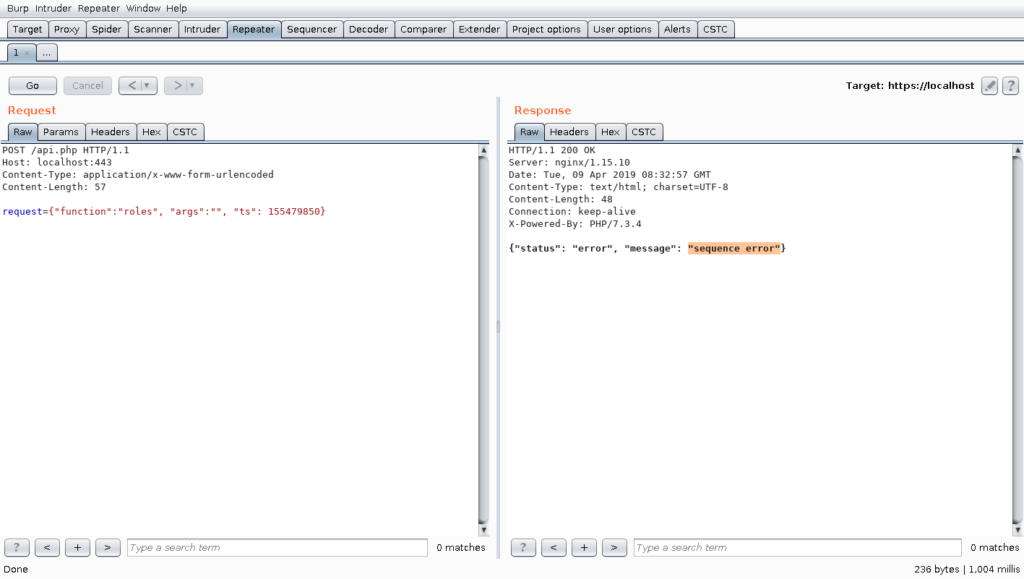
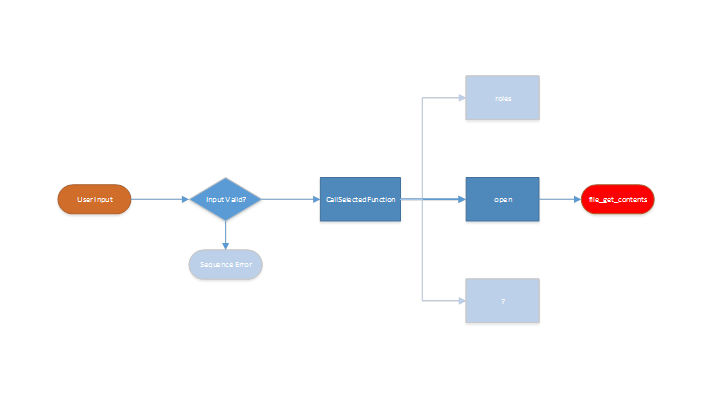
As one can see, the web application has an API using JSON encoded requests. An experienced Pentester will directly identify the last field in the dictionary as a UNIX timestamp. A short test after a few seconds reveals that the web application somehow checks this timestamp and ignores the request if the timestamp is not up to date:
A further test without supplying the correct timestamp is utterly pointless, because most modern web applications do an input validation before the data is further processed. In the following graphic, this problem is further illustrated:
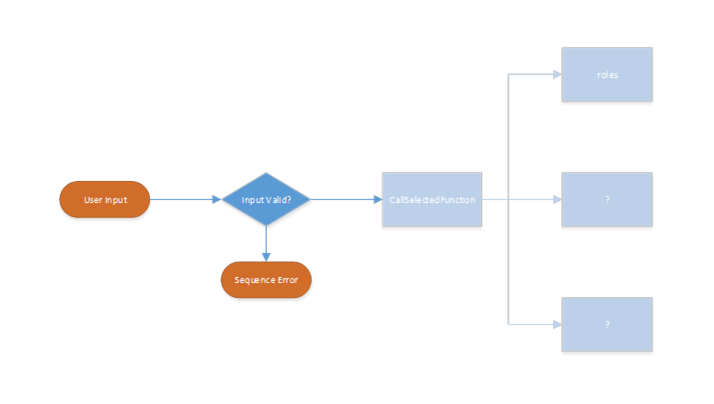
The interesting functions cannot be tested automatically, because the processing ends early without ever reaching the actual code for the different functions this web service implements. It is a bit like testing a web application without being correctly authenticated.
The CSTC provides an easy solution to the shown example. Without any extension, we have the problem that Burp has no feature of changing the timestamp inside the request to the current one.
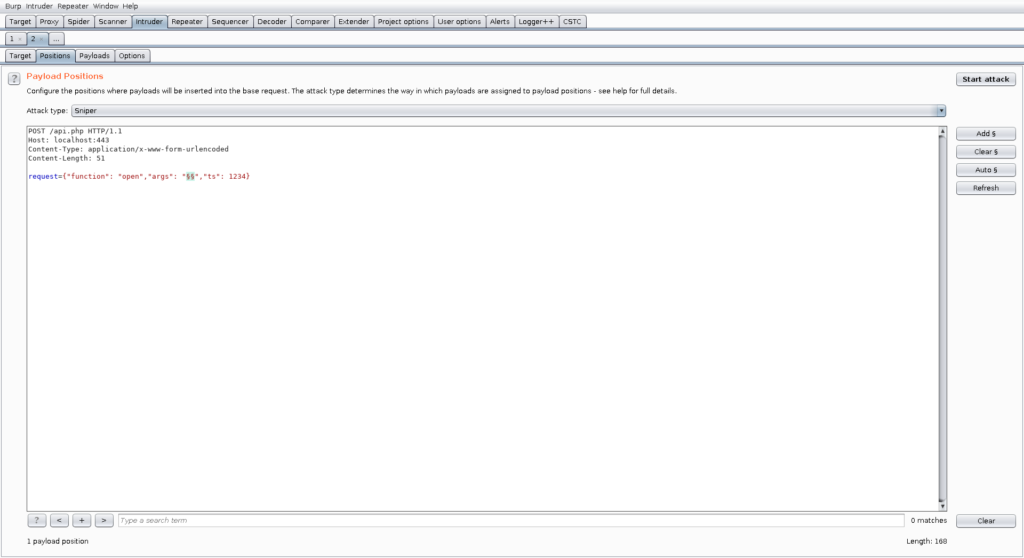
With the CSTC we can just create a very simple recipe for doing this. To create such recipes, it is useful to just send the request to the appropriate tab to the CSTC. For our purpose, we are going to use the outgoing tab, because we want to change the request from Burp to the web application.
The final recipe for this problem is shown below:
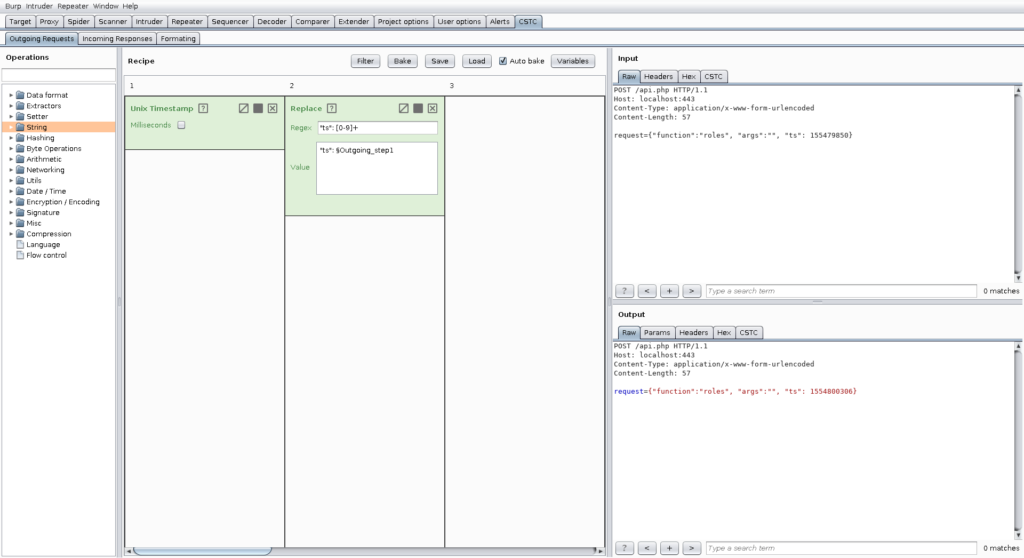
We use the first lane to just get the output of the Unix timestamp operation. This operation ignores the input, so it is used as single operation in a single lane. Then we use the second lane using a replacement operation with the regular expression “ts”: [0-9]+, which is just an expression for matching our timestamp including the appropriate key inside the JSON request. The replacement is again the key that we matched in the expression and we then append the result of the first outgoing lane.
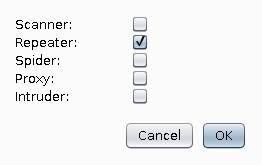
After setting up the recipe, we need to activate it for the tool we want to use. For now, we are going to activate it for the repeater tool by pressing filter and then selecting it:
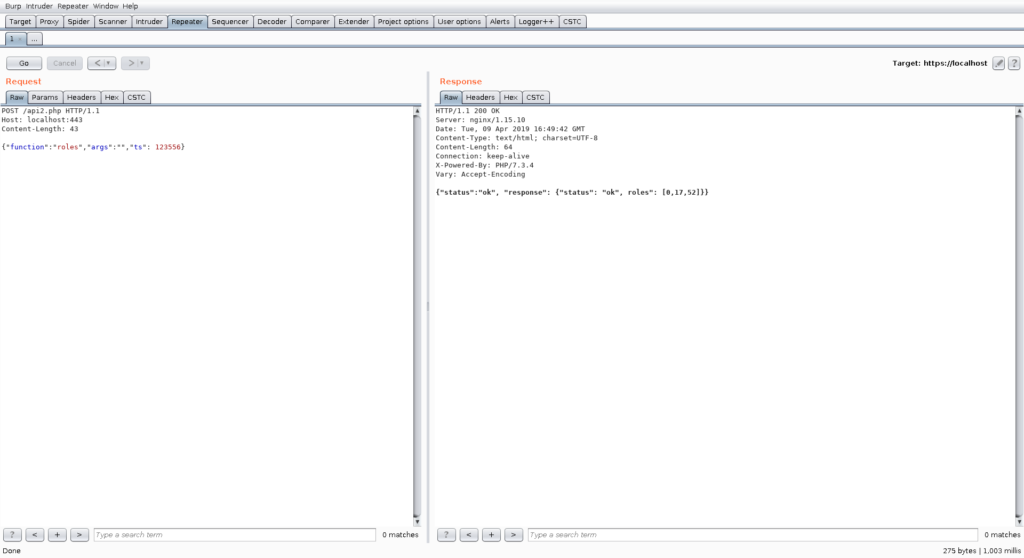
Then we can head back to the repeater tool and see that it now works:

However, that particular request seems to be not very interesting. We could now use the repeater to further investigate this API. For the sake of demonstration, we will now utilize the intruder to search for other interesting functions. We get back to the CSTC, enable the CSTC for intruder purposes as well, configure, and start an intruder for finding further functions.
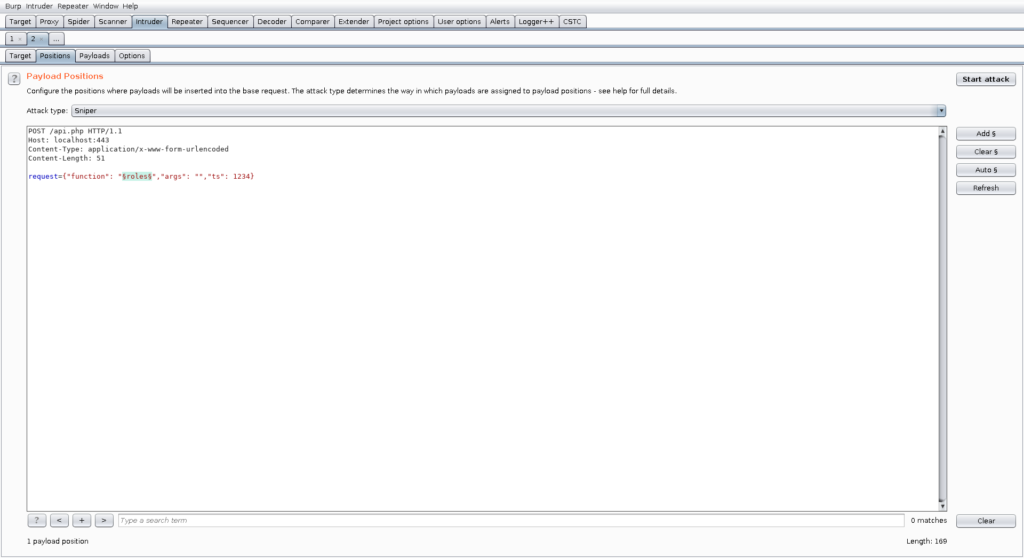
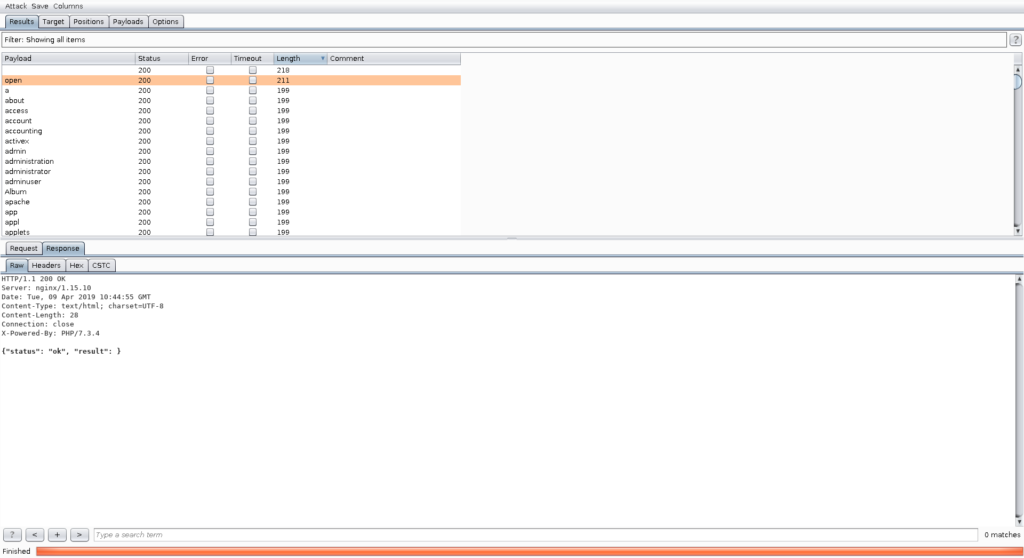
We are in luck and find another function called “open” which we can further test in the repeater. Again, for demonstration purposes, we will configure insertion points and utilize the Burp scanner to find vulnerabilities. After that, we activate the CSTC for the scanner as well.
As we can see in the following picture, the scanner found a vulnerability inside this open function:
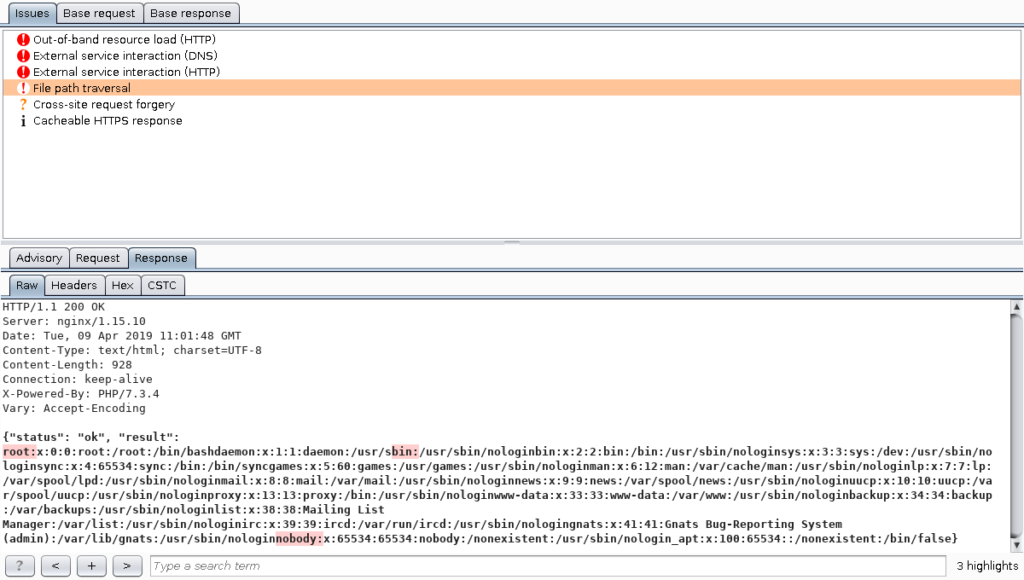
Therefore, we can see that we found a vulnerability behind the input validation:
In this example the CSTC assisted the Pentester providing a simple way of getting the inputs right to directly start testing instead of knowingly scratching the surface. We saw that an easy recipe like in this example can be used to further test web applications which otherwise would have required specialized Burp extensions, or tedious Burp macros.
Example 2
In this example, we use a similar API with the exception that it is used by a fat client using a HTTP-endpoint. The traffic is obfuscated using a simple xor operation. Obfuscating network traffic – instead of relying on authenticated, integrity checked and encrypted communication channels – is something that we come across quite often. Although the pure xor operation is something that is very simple, the amount of time used to adapt the used tools can be quite time consuming. Therefore, we want to show you how easy pentesting an obfuscated client can be using the CSTC and how this can speed up your work.
In the following, you can see the obfuscated request and response:

As you can see, in the current state, without further extending Burp, there is no way of testing this application or using standard tools to test it.
Now we are going to activate the following two recipes for incoming and outgoing traffic:
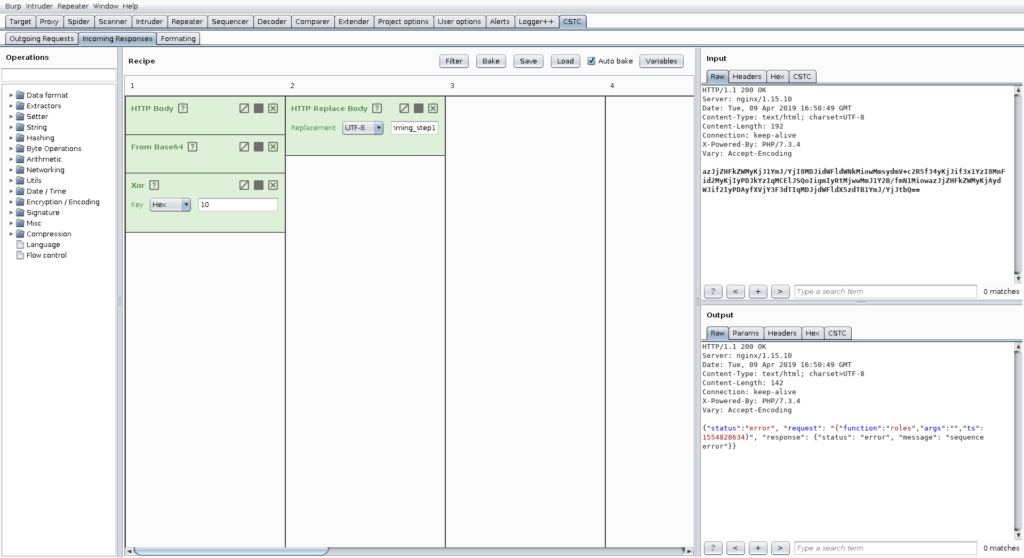
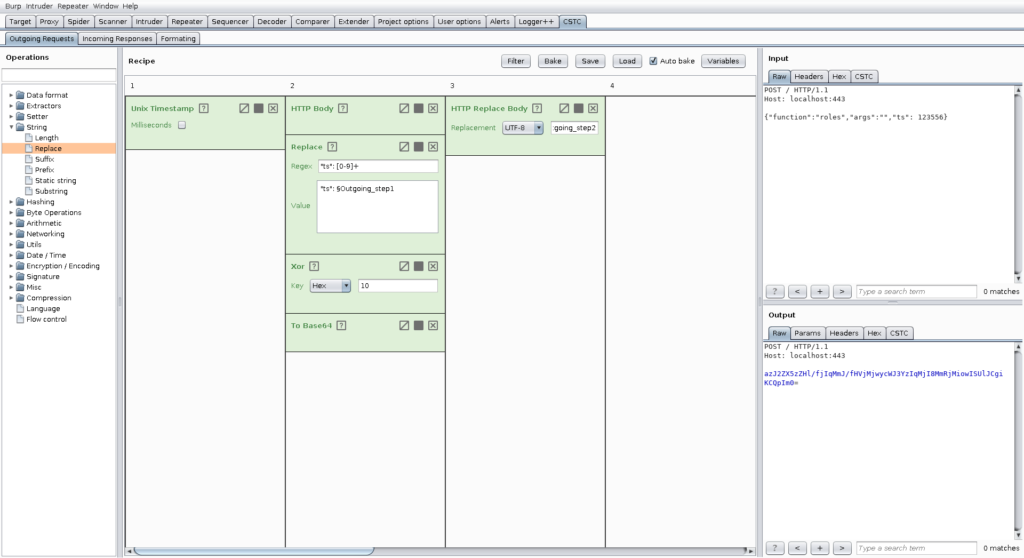
With these two recipes enabled, testing this application is now as easy as testing every other application. In addition, we can introduce further convenience features like fixing sequence numbers and putting them in before submitting the request to the server.
You can also use other tools like sqlmap with Burp as a proxy to transparently interact with the endpoint.
Insights
For more information on our CSTC check out our demo video on YouTube.
The video gives a short introduction on the general idea of the CSTC and how to get it up and running. Furthermore, it walks you through the UI and features of the plugin along the lines of exemplary use-cases.